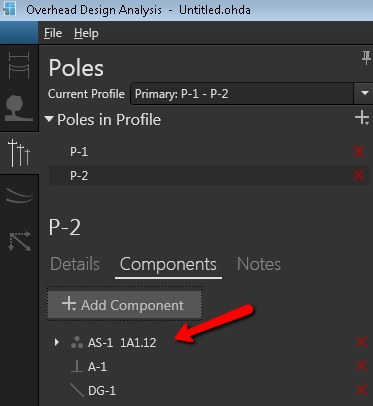
When you edit an assembly, Overhead Design Analysis (OHDA) allows you to swap the assembly for another assembly in the list, change the position of the assembly on the pole, or modify the assembly angle.
Swap an Assembly
To swap an assembly on a pole, follow these steps:
- Go to the Poles tab.
- Under Poles in Profile, select the pole that has the assembly you want to modify.
- Click Components to access the Components tab.
- Double click the assembly to open the Edit Assembly form.

- Click the Swap button just below the assembly name to open the Swap Assembly form.
- Select a new assembly from the drop-down list.

OHDA only displays assemblies that are valid for swapping with the current assembly. The following criteria is met in the choices provided: - Sufficient pins or insulators are available to support the number of cables on the current assembly.
- There is no pole top bracket unless the assembly being swapped out is the top assembly.
- A vertical assembly is not offered when swapping a subassembly of a line and buck.
- Check the Apply to All Poles checkbox if you want the change to apply to the assemblies on all poles in the profile.

- The Apply to All Poles selection works for assemblies on the same vertical level. You may have an instance where a conductor required an assembly level change. In this instance, Apply to All Poles will not swap all assemblies that hold the conductor.
- If one pole in a scenario violates a swapping rule, the assembly will not be available to swap on all poles.
- Click the Swap button to complete the swap.
- Optional. Click Calculate to analyze the modified design.
Macro Assembly
A macro assembly (line and buck) is designed to handle extreme angles in a profile. If one is available in the Assembly list, you can select it in the Swap Assembly form to accommodate profiles with line angles that produce too great a force for an inline assembly to handle.
After you select a macro assembly and click Swap, the Swap Assembly form closes and an Edit Assembly form opens, allowing you to set the angles of both assemblies individually. If you check the Auto Angle checkbox, OHDA will set the line and buck assemblies perpendicular to their respective incoming or outgoing conductors. Cables are automatically distributed across the assemblies with jumpers added to continue the circuits.
If you want to swap the line with the buck, you can click the Swap Line with Buck button. You will only notice a change if the two assemblies are of different types.
Edit Assembly Position
To edit an assembly's position on a pole, follow these steps:
- Go to the Poles tab.
- Under Poles in Profile, select the pole that has the assembly you want to modify.
- Click Components to access the Components tab.
- Double click the assembly to open the Edit Assembly form.
- Edit the numbers in the Position section. If you are using the 3D View, you can click and hold the red arrow on top of the assembly and drag the assembly to a new position. Release the mouse button to set the position.
Edit Assembly Angle
By default, OHDA places an assembly on a pole at the bisector angle, and at the end of the run, OHDA places cross arms on the outside of poles. If either of these placements is not correct, you can modify the configuration.
To change the angle of an assembly, follow these steps:
- Go to the Poles tab.
- Under Poles in Profile, select the pole that has the assembly you want to modify.
- Click Components to access the Components tab.
- Double click the assembly to open the Edit Assembly form.
- Uncheck the Auto Angle box to turn it off.
- Modify the assembly angle.
- Click Apply.
As long as Auto Angle remains unchecked, the new value will persist. If you check the Auto Angle checkbox to turn it on again, calculations are done to place the assembly in the original position.
