The Assembly Information form is where you add or delete components from the targeted assembly. The form consists of a list of associated components for the selected assembly. Information for the currently targeted component is below this form, with a 3D representation of the assembly to the right.
Using the Assembly Information form, you can:
Click to toggle view of Assembly Information form
Assembly Information form
Add Components to an Assembly
Follow these steps to add a component to an assembly:
- Double-click the assembly you want to target from the assemblies list. This will open the Assembly Information dialog.
- Add components to the inline assembly or macro assembly using the plus (+) symbol next to the assembly name. Available components are:
OHDA Assembly Creator does not allow users to place insulators on the middle crossarm of a triple crossarm assembly (the inner board). You might be inclined to add insulators to the first crossarm on the assembly, then continue to add crossarms until you have added all three, but we recommend adding all the crossarms first, then placing insulators on the outer crossarms. This will help you build assemblies more efficiently. Here are the recommendations when adding insulators to crossarms:
Single crossarm:
- Add insulators to that crossarm.
Double crossarm:
- Add insulators to either crossarm.
Triple crossarm:
- Add insulators to either the first or third crossarm (the two outer crossarms).
- Add all crossarms first, then add insulators to the appropriate crossarms.
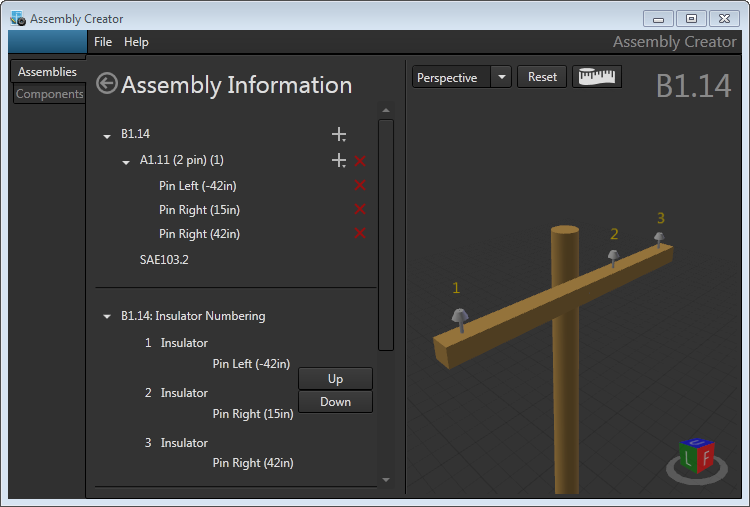
Delete Components from an Assembly
Deleting components from an assembly is a straightforward process in Assembly Creator. Click the red X to the right of the item in the list of components to remove from the assembly.
 |
If a component does not have a red X, then there is a dependency that will protect the component from deletion. |
Assemblies (Macro)
You can delete one or both assemblies in a macro assembly. Click the red X to the right of assemblies you want to delete. You cannot delete individual cross arms or insulators in a macro assembly.
Attachment hardware
Click the red X next to the attachment hardware to delete. If a cross arm exists in the assembly, a red X will not appear next to its associated attachment hardware. You must delete the cross arm before you can delete its attachment hardware.
Cross arms
Click the red X next to the cross arm you want to delete. Deleting a cross arm automatically deletes any insulators connected to it, as well.
Brackets
Under the assembly, click the red X next to the pole top, neutral, or vertical bracket to remove.
Insulators
Click the triangle to the left of a cross arm to toggle expansion of its list of insulators. Click the red X next to the insulators you want to delete.
Edit Components from an Assembly
You can double-click the components in the component list or on the preview canvas to edit their attributes. When you select a component, a Zoom To button appears at the bottom of the form. Click this button to zoom to and center the component in the preview window. If you are editing a compound component like a cross arm assembly or vertical bracket assembly, then Assembly Creator will display Update and Cancel buttons, also. When available, you must click Update to save changes, otherwise Assembly Creator saves your edits automatically.

|
In the case of vertical brackets, double-clicking a bracket component that is part of a series of vertical brackets will open its individual edit form. If only one vertical bracket exists, however, the edit form will expand to include bracket quantity, distance apart, and position. |
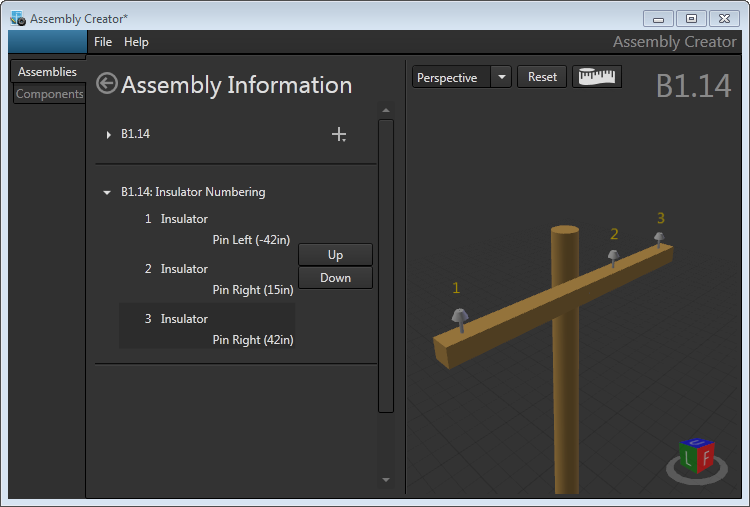
Change Insulator Numbering
Insulator numbers are used to pair cables with insulators in Overhead Design Analysis (OHDA).
To reorder insulator numbers:
- Select an insulator by clicking its name in the Insulator Numbering section of the Assembly Information form.
- Click the Up or Down button to renumber the insulator.
- Review the insulator numbering on the preview screen. Select and move other insulator numbers, as needed.
- Select File > Save to save changes to the insulator numbering. OHDA respects the insulator numbering set in Assembly Creator.