Available in Responder Explorer. Requires Smart Operations Solution and DMS Integration.
The Restoration Workflow tools allow Responder to integrate with DMS. Using this integration the user can access DMS and retrieve fault location data as well as automatically create steps to isolate the fault and restore power to customers based on DMS analysis. Restoration Workflow provides three tools on confirmed incidents in Responder Explorer: Get Fault Location, Get Fault Isolation Steps, and Get Supply Restoration Steps.
 |
A device with an unconfirmed incident in Responder Explorer cannot be restored in OASyS.
|
Get Fault Location
This tool uses DMS analysis to identify possible fault locations and symbolize them on the map.
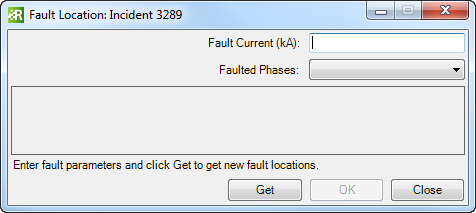
- Right-click a Confirmed incident and select Get Fault Location. This tool is not available on Unconfirmed or Probable incidents. This brings up the Fault Location window.

- Enter a Fault Current and/or Faulted Phases. Faulted Phases is optional, but Fault Current is required. If you do not enter a value in the Faulted Phases field, it defaults to all phases.
When the cut is placed, it uses the Faulted Phases value to determine on which phases the cut resides. If no value is in the Faulted Phases field, then the cut is placed on all phases.
- Click Get to retrieve fault location information.
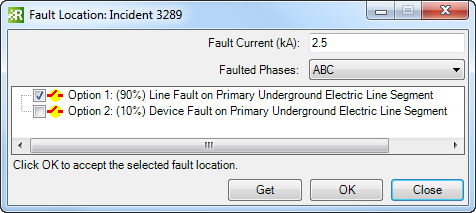
- Responder queries DMS for fault location information and displays it on the Fault Location window. You may right-click an option to access navigation tools. Select Highlight, Zoom To or Pan To and view the fault location in ArcMap. Select Locate in DMD to view the fault location in DMD Client. Quick Attribute Viewer displays attribute information about the line on which the fault occurs.

- Select an option and click OK to accept the selected fault location. This adds the fault line to the selected incident. Next, you can execute the Get Fault Isolation Steps tool.
Get Fault Isolation Steps
Once you have identified the fault location and added the faulty line to your incident (by creating a cut), you can use Isolation tab in the Switching Order Editor to retrieve steps to isolate the fault location. This tool uses DMS to identify the best way to isolate the fault and create a restoration order with those steps.
- Right-click the incident and select Restoration Steps. There are two additional tabs to the bottom portion of the screen: Isolation and Restoration. You'll use the Isolation tab to retrieve the Fault Isolation Steps. The Restoration tab is used in a later step.
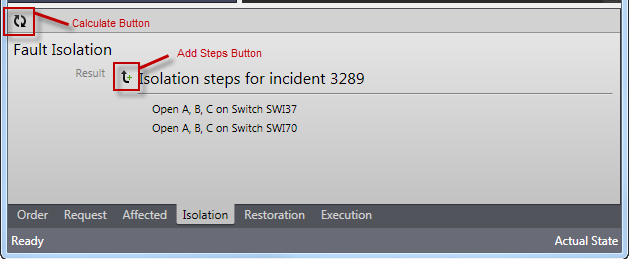
- On the Isolation tab, click the Calculate button. This allows the tool to calculate the operations necessary to isolate the cut. The Isolation tab displays the devices that may be operated to isolate the fault location. You may right-click a device to access navigation tools. Select Highlight, Zoom To or Pan To and view the device in ArcMap.

- Click the Add Steps button to move the operations to the Operations section.
- Execute the steps before continuing to the Get Supply Restoration Steps section. During execution, you may see a message that says "Awaiting External Execution." This indicates that there's a pending operation and the Switching Order Editor is awaiting a response from OASyS.
Get Supply Restoration Steps
Be sure to execute the Fault Isolation steps before running this tool.
Now that you have identified the fault location, and created and executed the isolation steps, you can use the Restoration tab in the Switching Order Editor to add steps to restore power to customers. This tool uses DMS analysis to identify the best way to restore power to customers.
- In the Restoration Order, select the Restoration tab.
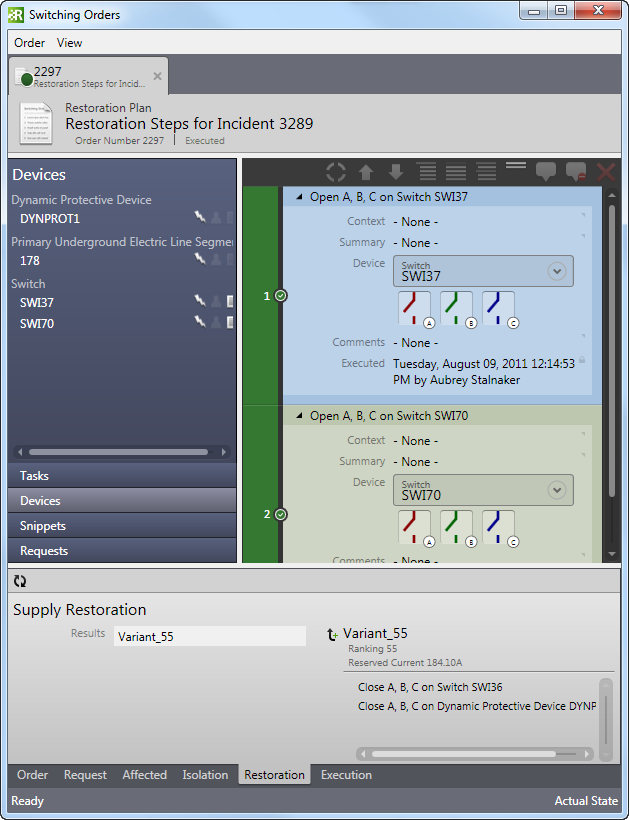
- Click the Calculate button on the Restoration tab. This allows the tool to calculate restoration steps. The Restoration tab displays the devices that may be operated to restore power. You may right-click a device to access navigation tools. Select Highlight, Zoom To or Pan To and view the device in ArcMap.
- Click the Add Steps button to add the restoration steps to the Operations window.
- Execute the restoration operations. At this point the fault location has been isolated and is ready to be repaired. Devices have been operated to restore power to customers.
- Once the fault has been repaired, open the Restoration Order and create the operations necessary to return the network to its Normal State. You can right-click the executed operations and choose Reverse to easily create these operations.


