The Identify tool allows a user to click a portion of the map and display information about features at that location. When the user clicks the map with the Identify Tool  , the Identify Tool finds features at that location and displays them according to the option selected from the pull-down menu. If the Identify Tool tab is not displayed, select View > ArcFM Identify Tool from the main menu.
 |
The Identify tool works only with spatial feature classes. It does not identify tables. |
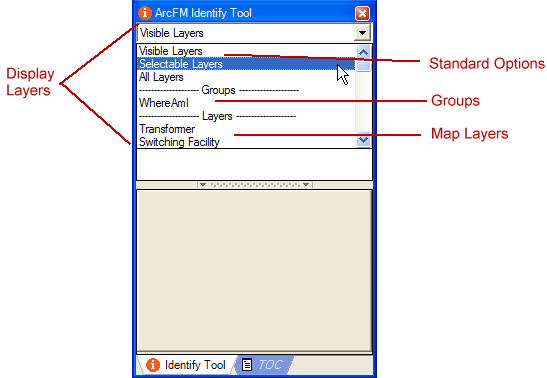
The pull-down menu provides options to determine the information displayed when the user clicks the map. These are divided into three sections:
- Standard Options: These are the options available by default and include Visible Layers, Selectable Layers and All Layers. The Visible Layers option displays only layers that are visible in the map (this option does respect the Visibility scale for a layer). The Selectable Layers option displays only features that are set as selectable. The All Layers option indicates all layers in the map. So if the user clicks the map with this option selected, the Identify tool returns all features in that vicinity.
- Groups: This list is created by assigning a custom model name to a group of feature layers. This list may be empty if your Administrator did not create custom model names. Any option in this portion of the list will display features that are assigned that model name. This allows the Administrator to create a custom model name (e.g., ElectricDevices) and assign it to multiple feature layers (e.g., fuses and switches). When the user selects this option and clicks the map, all fuses and switches in that area are returned. This list is filtered based on the layers in the map. If none of the layers in the open map have a model name assigned, it will not appear in the list. The ArcFM Solution Configuration Guide discusses in detail how to configure this option.
- Map Layers: This is a list of all layers in the current map. The user may select a layer and click the map to return all features of that type in the vicinity. For example, select Transformer, click on the map and all transformers (if any) at that location are displayed on the Identify tab. The display order is determined by the Layer Ordering option on the Attribute Viewer tab of the ArcFM Viewer Options.
- Select an option from the pull-down menu.

- Select the Identify Tool
 button from the Map Tools toolbar and click in the map or click and draw a square to identify the selected layers in a particular area.
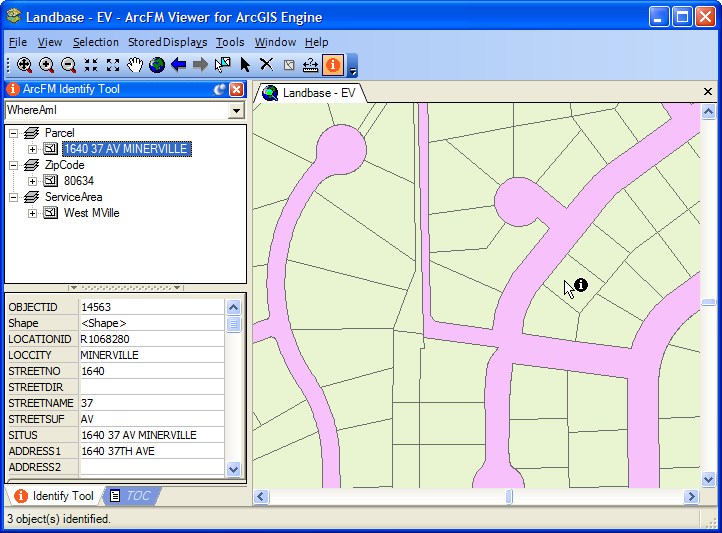
All features at that location are displayed on the ArcFM Identify Tool tab as determined by the option selected in step 1. In the example below, the Identify tool found all features at the click location with the custom model name "WhereAmI" assigned. In this case the custom model name is assigned to Parcel, Zip Code, ServiceArea, and Hydrology layers. Since no Hydrology feature resides at the click location, no Hydrology feature is displayed on the Identify tab.
You may right-click a feature in the Identify Tool tab perform any of the following: Zoom To, Pan To, Highlight, and Add to Selection. Right-click the layer and select Add to Select to add all selected features for that layer.

