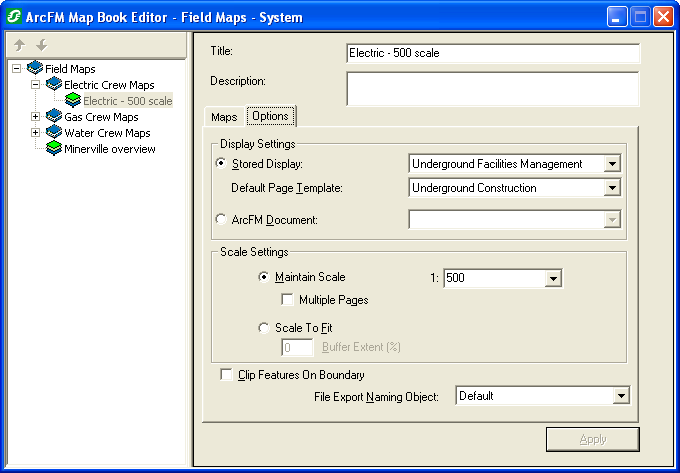
The Options tab of the ArcFM Map Book Editor allows you to save information about how the map grids in the map set are printed. These options are saved with each map set and consequently the map book.

- Select the Options tab to make changes to how the map set is displayed.
- Set the Display Settings. Select the appropriate stored display and page template, or document from the lists. The page template you select here will act as the default page template for all map sheets in the set. You may assign a different page template to each map sheet. This option is further discussed on the Map Set Page Templates page. If you select a document on the Options tab, any page templates assigned to individual map sheets on the Maps tab will be cleared.
- Set the Scale. Choose either Maintain Scale or Scale to Fit.
Maintain Scale centers the plot over the map sheet feature zooming in/out from its extent to the specified scale. Multiple pages may be used by selecting the Multiple Pages checkbox. If the feature extent is larger than the data frame at the given scale, data will tile across several sheets. If the Multiple Pages checkbox is NOT selected and the feature extent is larger than the data frame at the given scale, the data will be clipped.
Scale to Fit reduces or enlarges the feature extent into the data frame, thus changing the scale at which each map sheet is plotted. Each feature extent is further scaled by the percentage you enter. Scale to Fit is disabled if the page template data frame has a fixed scale extent. Set the data frame's extent by right-clicking the data frame and selecting Properties. The extent may be set on the Data Frame tab. See Esri's online help for more information.
 |
The page size in your Page Template or Document (visible in the Layout view) must correspond with the printer's page size. If the page size of your Page Template or Document is larger, the page will be clipped. It will not be tiled. To change the page size, view the Page Template or Document in the Layout view. Right-click it and select Page Setup (or select Page Setup from the ArcMap File menu). Change the Map Size to correspond to the Printer Page Size and resave the Page Template or Document. |
- Clip Features on Boundary will clip the data of each plot at the boundary of the grid feature. Select the checkbox to enable.
- The File Export Naming Object is used to provide the files created by an export with a specific naming scheme. The default setting assigns a number to the exported files. For example: Untitled1_0.bmp, Untitled2_0.bmp, etc. Export naming options may be added to this field programmatically by your administrator (see ArcFM Solution Resource Center).
- Click Apply to save your changes.
Next you will create a selected set of map grids using the Maps tab.


