
Version: 10.2.1c and 10.2.1c SP3 |
| ArcFM Desktop > Designer > CU Administration > Manage Filters > Manage Take-Off Filters |
A Take-Off filter presents a list of materials appropriate for the existing facilities in the design. This topic describes how the end-user might utilize a Take-Off filter in the CU Filter tool as well as how to create one in the CU Administration tool.
A Designer can select a take-off filter, then choose a feature on the map. The cursor snaps only to features that participate in a take-off filter.
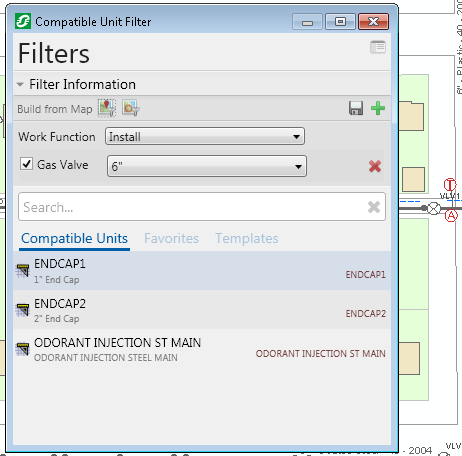
For example, the GasValve feature class (Diameter field) has been assigned to a take-off filter in the CU Administrator. When the Designer clicks the Take-Off button in ArcMap, the Compatible Unit Filter disappears and the cursor changes to the cross-hairs symbol, indicating that the Designer must select a feature. Because the Gas Valve feature is the only one assigned to a take-off filter, the cursor snaps only to gas valves. Once the Designer clicks a gas valve on the map, the Compatible Unit Filter returns and displays all compatible CUs based on the Diameter field.

Figure 1, Take-off filter in Designer (ArcMap)
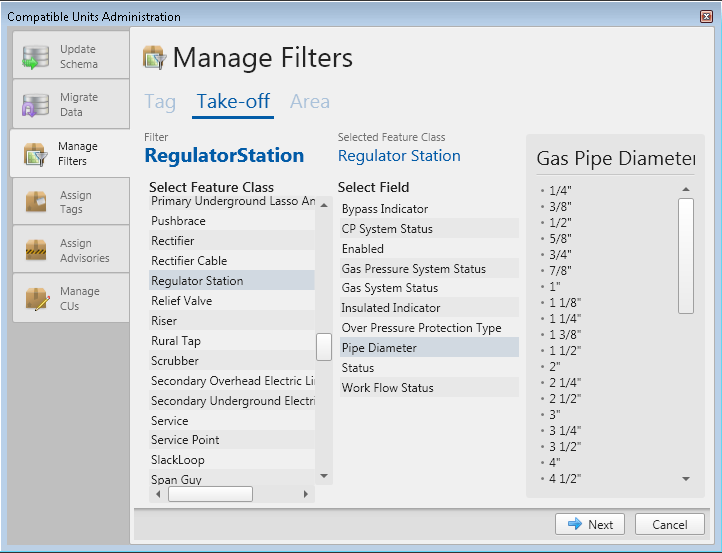
As an example in this section, we're going to create a take-off filter that enables when the user selects a Regulator Station or a Town Border Station and filters the available CUs based on the Pipe Diameter field.
 |
When creating a take-off filter, there cannot be other users accessing the database (e.g., ArcMap open). |

Figure 2, Create take-off filter
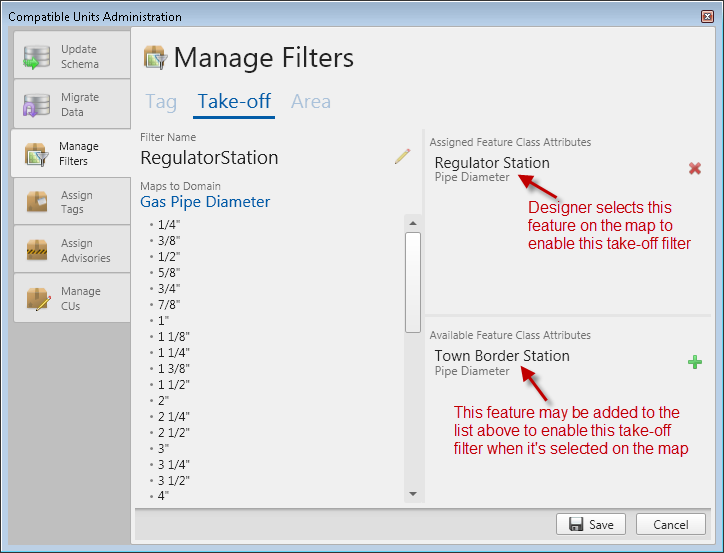
The next screen displays the name of the filter and the domain it uses in the first column. You can double-click the Filter Name field to edit it. Click Save.
The second column shows the feature class that must be selected to enable the take-off filter (Assigned Feature Class Attributes field). It also displays other feature classes that use the same domain (Available Feature Class Attributes). You can add these feature classes to the Assigned Feature Class Attributes field.

Figure 3, Create take-off filter
Click the red X next to a feature class in the Assigned Feature Class Attributes field to remove it from the filter.
Figure 4, Assign tags
This section outlines how to edit an existing take-off filter using the CU Administration tool.
Click the red X next to a take-off filter to delete it. A deleted take-off filter cannot be restored. It must be recreated.