Configuring Responder/Smart Grid
Create Spatial Views
| Smart Grid Applications Overview > Responder Overview > Implement Responder > Data Preparation > Set Up Responder Map Layers > Create Spatial Views |
Rather than using Join Layers to create the Calls and Load Points layers, you can use Spatial Views. All other Responder layers are created using XY Event Layers or Query Layers. With this method, Responder users may see an increase in performance.
Below is a sample Oracle script for the Calls view, followed by a sample script for the Load Points view.
Calls:
sdetable -o create_view -T CALLS_SPVIEW -t ARCFM.SERVICEPOINT,RESPONDER.RX_CALLS
–c ARCFM.SERVICEPOINT.OBJECTID,RESPONDER.RX_CALLS.ID,RESPONDER.RX_CALLS.DEVICE_OID,RESPONDER.RX_CALLS.DEVICE_FCID,
RESPONDER.RX_CALLS.INCIDENT_ID,RESPONDER.RX_CALLS.CUSTOMER_ACCOUNT,RESPONDER.RX_CALLS.SHAPE,RESPONDER.RX_CALLS.TROUBLE_AT_ACCOUNT
-w "ARCFM.SERVICEPOINT.OBJECTID=RESPONDER.RX_CALLS.DEVICE_OID" -i sde:oracle10g -u username -p password@server -s server
Load Points:
sdetable -o create_view -T LOADPOINTS_SPVIEW -t ARCFM.SERVICEPOINT,RESPONDER.RX_LOADPOINTS
-c ARCFM.SERVICEPOINT.OBJECTID,RESPONDER.RX_LOADPOINTS.ID,RESPONDER.RX_LOADPOINTS.DEVICE_OID,RESPONDER.RX_LOADPOINTS.DEVICE_FCID,
RESPONDER.RX_LOADPOINTS.INCIDENT_ID,RESPONDER.RX_LOADPOINTS.SHAPE -w "ARCFM.SERVICEPOINT.OBJECTID=RESPONDER.RX_LOADPOINTS.DEVICE_OID" -i sde:oracle10g
-u username -p password@server -s server
     SELECT gisadmin.SERVICEPOINT.OBJECTID, gisadmin.SERVICEPOINT.Shape, Responder.RESPONDER.RX_LOADPOINTS.ID, Responder.RESPONDER.RX_LOADPOINTS.DEVICE_OID,
     Responder.RESPONDER.RX_LOADPOINTS.DEVICE_FCID, Responder.RESPONDER.RX_LOADPOINTS.INCIDENT_ID FROM Responder.RESPONDER.RX_LOADPOINTS INNER JOIN
     gisadmin.SERVICEPOINT ON Responder.RESPONDER.RX_LOADPOINTS.DEVICE_OID = gisadmin.SERVICEPOINT.OBJECTID
 |
The shape field is also included to make it a spatial view. |
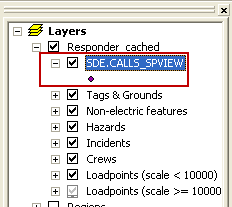
Once your Database Administrator has created these views in the database, you can add them to your Responder_cached group in ArcMap.
If you have separate databases for your GIS and Responder data, then use the following steps:
create view GISDATABASENAME.RESPONDERDATAOWNER.rx_calls_view as select * from RESPONDERDATABASENAME.RESPONDERDATABASEOWNER.rx_calls
create view GISDATABASENAME.RESPONDERDATAOWNER.rx_loadpoints_view as select * from RESPONDERDATABASENAME.RESPONDERDATABASEOWNER.rx_loadpoints
|
There can not be any spaces between table names and column names (after the -t and -c). You have to use -u (username) as responder (the schema owner of the responder tables) and -D is the destination database name (in the example below we use GISDATABASENAME). |
sdetable -o create_view -T calls_spview -t GISDATABASENAME.GISDATABASEOWNERNAME.servicepoint,GISDATABASENAME.RESPONDERDATABASEOWNER.rx_calls_view -c GISDATABASENAME.GISDATABASEOWNERNAME.servicepoint.shape,GISDATABASENAME.GISDATABASEOWNERNAME.servicepoint.objectID,GISDATABASENAME.GISDATABASEOWNERNAME.servicepoint.phasedesignation,GISDATABASENAME.RESPONDERDATABASEOWNER.rx_calls_view.ID,GISDATABASENAME.RESPONDERDATABASEOWNER.rx_calls_view.device_OID,GISDATABASENAME.RESPONDERDATABASEOWNER.rx_calls_view.device_FCID,GISDATABASENAME.RESPONDERDATABASEOWNER.rx_calls_view.incident_ID,GISDATABASENAME.RESPONDERDATABASEOWNER.rx_calls_view.customer_account,GISDATABASENAME.RESPONDERDATABASEOWNER.rx_calls_view.trouble_at_account -w "GISDATABASENAME.GISDATABASEOWNERNAME.servicepoint.objectID=GISDATABASENAME.RESPONDERDATABASEOWNER.rx_calls_view.device_OID" -i sde:sqlserver:DATABASEINSTANCENAME -u RESPONDERDATABASEOWNER -p RESPONDERDATABASEOWNERPASSWORD -s DATABASESERVERNAME.DOMAINNAME.COM -D GISDATABASENAME
sdetable -o create_view -T loadpoints_spview -t GISDATABASENAME.GISDATABASEOWNERNAME.servicepoint,GISDATABASENAME.RESPONDERDATABASEOWNER.rx_loadpoints_view -c GISDATABASENAME.GISDATABASEOWNERNAME.servicepoint.shape, GISDATABASENAME.GISDATABASEOWNERNAME.servicepoint.objectID, GISDATABASENAME.RESPONDERDATABASEOWNER.rx_loadpoints_view.ID, GISDATABASENAME.RESPONDERDATABASEOWNER.rx_loadpoints_view.device_OID, GISDATABASENAME.RESPONDERDATABASEOWNER.rx_loadpoints_view.device_FCID, GISDATABASENAME.RESPONDERDATABASEOWNER.rx_loadpoints_view.incident_ID -w "GISDATABASENAME.GISDATABASEOWNERNAME.servicepoint.objectID=GISDATABASENAME.RESPONDERDATABASEOWNER.rx_loadpoints_view.device_OID" -i sde:sqlserver:DATABASEINSTANCENAME -u RESPONDERDATABASEOWNER -p RESPONDERDATABASEOWNERPASSWORD -s DATABASESERVERNAME.DOMAINNAME.COM -D GISDATABASENAME
For an additional performance improvement, do not display these layers at large scales.