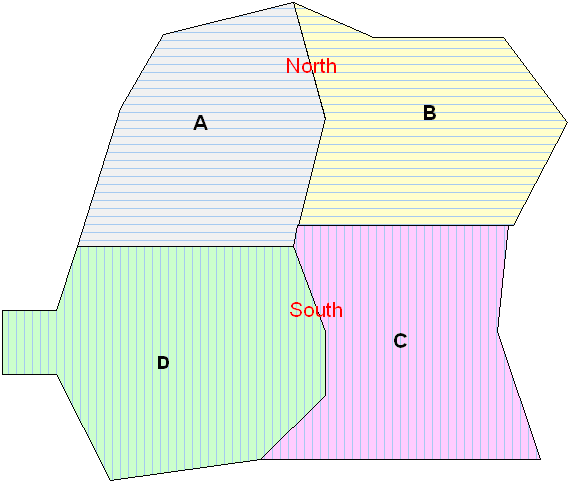
Responder supports the concept of regions - also called areas of responsibility, districts, zones, etc. Regions are designated by polygons drawn on the map. Using model names, your administrator can break regions into three levels for display and reporting purposes.
In the example below, the largest polygon contains two mid-sized regions (North and South) as well as four small regions (A, B, C, and D).

To configure regions:
- In ArcCatalog, Create a feature class for regions (e.g., Region). This class typically resides in the Landbase or Cartographic dataset. In order to later place regions in your map, it must belong to a dataset that has been registered as versioned. The feature class must have a data type of Polygon. It must also have the following fields. You may name them anything you wish, however, the model names must be assigned as shown in later steps.
RegionName (text; length=50)
ParentRegion1 (text; length=50)
ParentRegion2 (text; length=50)
 |
The ParentRegion1 and ParentRegion2 fields are optional. These allow you to create multiple levels of regions.
|
- Assign the RXREGION model name to the region feature class. This model name is required whether you wish to use regions or not.
- Assign the RXREGIONNAME field model name to the field that contains the text name of the region (e.g., RegionName). This is the smallest region (e.g., A, B, C, and D). This model name is required whether you wish to use regions or not.
- Optionally, you may assign model names that further divide regions into levels.
- Assign the RXREGIONPARENT1 field model name to the field containing the text name of the region's parent (e.g., ParentRegion1). In the example, the values in this field are North and South.
- Assign the RXREGIONPARENT2 field model name to the field containing the text name of the region's parent (e.g., ParentRegion2). In the example, this region emcompasses all four smaller regions. Optionally, this region may consist of a different combination of smaller regions (e.g., East and West).


