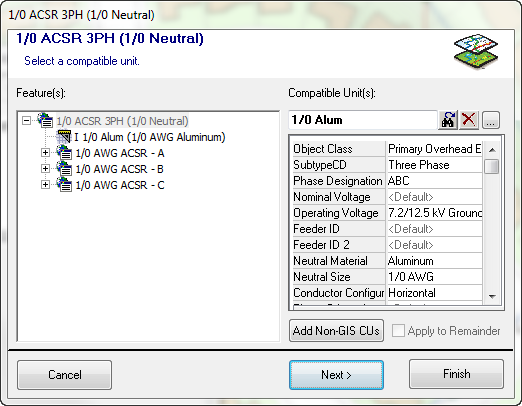
The user will be prompted to select a compatible unit (CU) only if the template favorite is placed with a design open. All features placed on the map when the template favorite is placed are added to the open design.

- Instructions from your administrator will appear in the white bar at the top of the dialog ("Select a compatible unit." in the example above).
- Unselect the Apply to Remainder checkbox to select a CU for each feature in the series. Leaving this checkbox selected applies your selection to all features in the series. If this checkbox is disabled, the feature isn't part of a series or is the last feature in a series.
- Select a CU in the Compatible Unit(s) field. If a CU appears under the GU node in the Feature(s) window, this CU will be used as a default. If you do not select a CU from the Compatible Unit(s) field, this CU will be placed. Select a CU and click OK. There are three buttons to help you easily find the appropriate CU: Find Next, Delete, and Browse.
 The Find Next button performs a search. Type the first few letters of the CU in the field. Click this button to search for matching CUs. Hit the Enter key to select the found CU and add it to the window at the left.
 The Delete button clears the contents of the field.
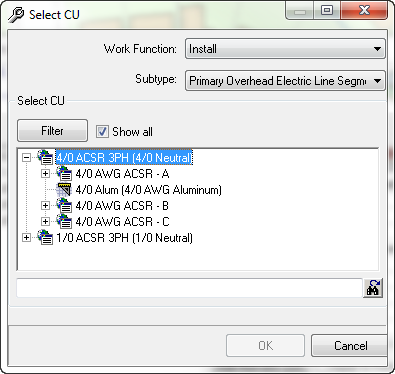
 Like Find Next, the Browse button performs a search. Click this button for a window to search for a CU. This screen also allows you to choose a different work function if another is available.

- You may use the Add Non-GIS CUs button to add a non-GIS CU.
- Click Next > to continue placing the template favorite.
- You may click Finish to complete placement of the template favorite, accepting as many defaults as possible. You will still be prompted for any required actions.


The Find Next button performs a search. Type the first few letters of the CU in the field. Click this button to search for matching CUs. Hit the Enter key to select the found CU and add it to the window at the left.
The Delete button clears the contents of the field.
Like Find Next, the Browse button performs a search. Click this button for a window to search for a CU. This screen also allows you to choose a different work function if another is available.