A composite favorite allows you to place multiple features on the map with a single click. For example, you can create a switch cabinet that contains a switching facility, bus bars, switches, and fuses. Once this composite favorite is created, the user only needs to click once on the map to place all of those features.
Create
If you wish to create a composite favorite in ArcMap, you must have an Edit session started. Ensure that any layers you want to include in your composite favorite are selectable. Use the table of contents' List by Selection view to define selectable layers. For more information, refer to Esri's documentation.
Designer Users: If you want to create a composite favorite that you can add to a design, use compatible units (CU) from the CU list in the table of contents to create your favorite rather than features. You can also convert an existing ArcFM composite favorite to use CUs in Designer.
- With an Edit session started, place features on the map you want to include in the composite favorite. They must appear the way you want them to appear when placed. You can also find the correct features (in the correct configuration) if they already exist on the map.
- Select the features on the map you want to include in the composite favorite. This creates a selected set on the Selection tab of the Attribute Editor. To remove unwanted layers from the selected set, right-click the feature on the Selection tab and select Remove from Selection.
Insertion Point: When you have the features selected on the map, you will see an X that indicates the center of all selected features. Figures 1 and 2 demonstrate this. The insertion point (X) moves when one of the features are moved. With your features selected, note the insertion point. If it does not appear to be in the middle of your selected features, ensure you do not have another feature selected in another part of the map.
To move the selection anchor, move the mouse pointer over it, press the Ctrl key, then drag the selection anchor to the desired location. Refer to Esri documentation for more information.
- With your features still selected, right-click a category in the System Favorites or User Favorites on the Features list and select Create Composite Favorite.
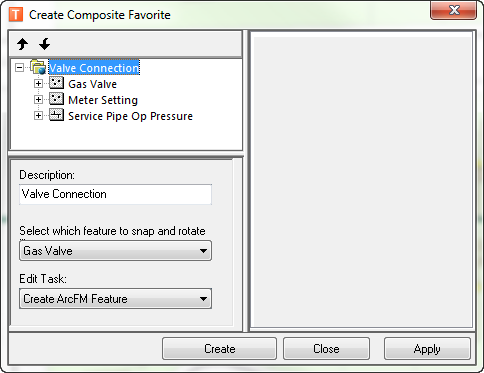
- The Create Composite Favorite dialog displays your selected features in the top window. Use the up and down arrows to arrange the order if you wish. You may select any feature in the list and view or edit its attributes. You may also assign it a Description.
 |
A composite favorite must have at least one point feature. |
Initially, the tool lists all features as individual nodes in the tree. Features are placed on the map in the order listed in the tree. To take advantage of ArcFM autoupdaters, you can change the order with the up/down arrows so that the autoupdaters are initiated in correct order.

- Enter a name for the favorite in the Description field. This is the name that will appear on the Features list in a favorite category.
- Select a feature from which your favorite will inherit snapping and rotating properties. The field is populated with point features that appear in your composite favorite.
- Select an Edit Task. "Create ArcFM Feature" is the default value.
- Click Apply to save your changes. Click Create to add the composite favorite to the selected favorite category on the Features list. Each time you click Create, another composite favorite is added to the Features list.
- Click Close to dismiss the Create Composite Favorite dialog.
Edit
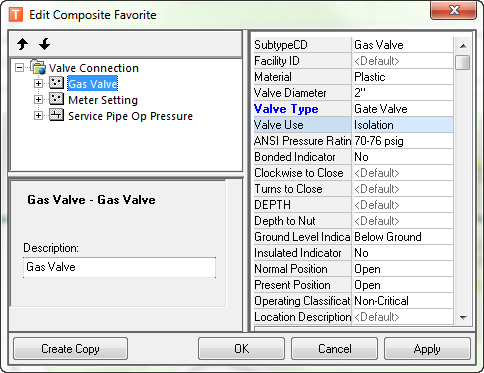
Edit Composite Favorite is available when you right-click an existing composite favorite. You can add related objects to existing composite favorites, edit them, or remove them. You can also edit attributes of the composite including Edit Task and properties such as snapping.
Right-click a composite favorite on the Features list and select Edit.

You may edit the name of the favorite using the Description field. Modify attributes using the object editor grid. Edited attributes have field labels displayed in blue. If a field does not accept a null value and no value is assigned, it is highlighted in yellow.
When you've finished making changes click OK to save edits and dismiss the window. Click Apply to save changes and retain the window for further changes. Click Cancel to close the dialog without saving changes. The Create Copy button is discussed later in this section.
Delete: To remove an existing composite favorite, right-click it in the Features list and select Delete.


