When using the Import tool, the user connecting to the database in ArcCatalog must choose a version that he or she has edit privileges on. This is necessary because these tools start an edit session before they make any changes to the database. That way, the user can cancel at any time and the changes to the database will be rolled back.
If you're importing a large XML after exporting a large XML (e.g., 50mb), you may encounter memory problems. To avoid this, restart ArcCatalog after exporting any large XML file.
 |
Files imported into your geodatabase using this tool must be XML and comply with the GxXML.dtd file found in the Bin\Xml folder of the ArcFM Solution installation directory.
|
- Select the geodatabase into which you want to import information.
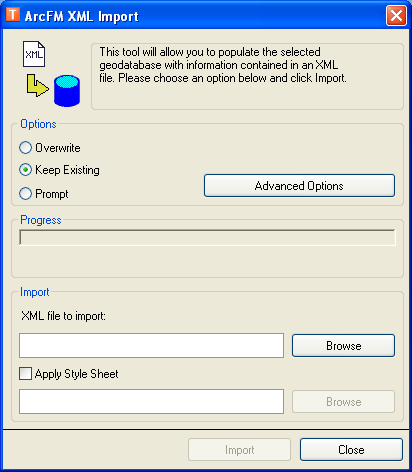
- Click the ArcFM XML Import
 button on the ArcFM Solution toolbar or right-click the geodatabase and select ArcFM XML Import. This tool is enabled only at the geodatabase level. You may click the Esc key to dismiss the XML Import dialog.

- Select how you want the information entered into the geodatabase: Overwrite, Keep Existing, or Prompt.
- Overwrite: This option replaces existing data with the imported information. The geodatabase feature class settings will be replaced with the settings in the XML file. Note about model names: With the Overwrite option, existing model names are not overwritten and new model names are appended.
- Keep Existing: This option will import settings only for feature classes in the geodatabase that donít already have settings. A feature class that has settings will not be overwritten, and the imported information will not be saved to that feature class. Note about Model Names: No model names are imported or changed with the Keep Existing option.
- Prompt: You will be prompted with each occurrence of duplicate data and given the option to overwrite the information. Select Yes to Overwrite and No to Keep Existing.

- Click the Advanced Options button.

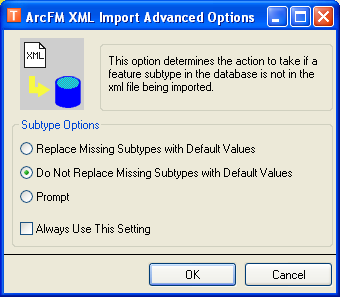
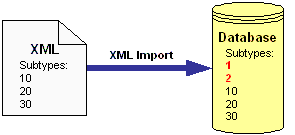
- Select an option in the Advanced Options window. This determines what happens to existing subtypes in the database when an XML that does NOT have those subtypes is imported. In the example below, these settings would impact Subtypes 1 and 2 (highlighted in red). The attributes for the remaining subtypes (10, 20, and 30) would be updated according to the option setting in step 3.

- Replace Missing Subtypes with Default Values: Modify the attributes in the subtypes (e.g., 1 and 2 in the example above) to match the attribute values in the <All> selection in the Subtype field.
- Do Not Replace Missing Subtypes with Default Values: Do not modify these subtypes and their attribute values.
- Prompt: Prompt the user.
- Use the "Always Use This Setting" checkbox to persist the selection.
- Click OK.
- Apply Style Sheet: Use this option to further tailor XML files. A list of style sheets and their uses is available in the Appendix.
 |
If you have XML that was exported in a release prior to 9.1 and are attempting to import it into ArcFM 9.1 or later, you must apply the ConvertToArcFM9Objects.xsl style sheet. If you do not use this style sheet, errors will occur. |
- Browse for and open the XML file to be imported.
- Click Import. A progress bar will be displayed to show the status of the import. You may click Esc to cancel.
 |
If the XML file to be imported contains EXTCLSID values from a geometric network and you are importing into a geodatabase without a geometric network, these values will NOT be imported. |
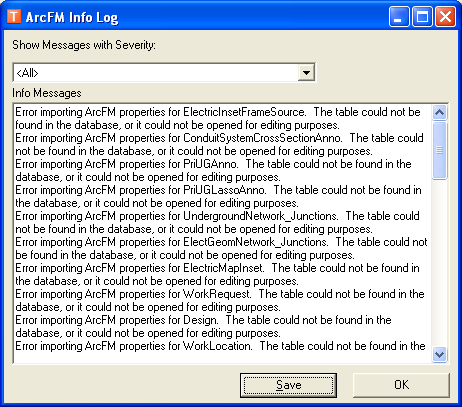
Import Log
If some information in the XML file cannot be imported, ArcFM creates a log and gives the user the opportunity to view it. This information log is not stored. If you elect NOT to view it, the information will be lost. If you choose to view the information log, you may click the Save button to save the information to a text file.


