You must make sure your geodatabase is correctly setup for seamless data sharing between ArcFM, ArcMap, and Overhead Design Analysis (OHDA). You must be logged in as the owner of the database for any changes to be saved.
PriOHElectricLineSegment / SecOHElectricLineSegment
For the Export to OHDA tool in ArcFM to correctly select overhead conductors for export, you will need to add the OVERHEADCONDUCTOR model name to the Electric Object Class Model Name domain:
- Open your geodatabase in ArcCatalog.
- Navigate to either of these tables.
- Right-click the table and select ArcFM Properties Manager.
- On the Model Names tab, select Electric Object Class Model Name from the Model Name Domain drop-down list.
- If OVERHEADCONDUCTOR is not in the Selected column, double-click it in the Available column.
- Repeat steps 3 - 5 for the other table.
- Click OK or continue with the following steps.
You will also need to make sure the NOMINALVOLTAGE, PHASEDESIGNATION, NEUTRALMATERIAL, and NEUTRALSIZE field names are applied to the Electric Field Model Name domain:
- Open your geodatabase in ArcCatalog.
- Navigate to either of these tables.
- Right-click the table and select ArcFM Properties Manager.
- On the Field Model Names tab, select either the NOMINALVOLTAGE, PHASEDESIGNATION, NEUTRALMATERIAL, or NEUTRALSIZE Field Name in the Fields section.

You must have all these field model names available for OHDA to function properly. - In the Field Model Names section, select Electric Field Model Name from the Model Name Domain drop-down list.
- If the Field Name you have selected is not in the Selected column, double-click it in the Available column to move it over.
- Click OK.
Finally, you will need to create a relationship class between PriOHElectricLineSegment and CONDUCTORINFO and SecOHElectricLineSegment and CONDUCTORINFO:
- Open your geodatabase in ArcCatalog.
- Select File > New > Relationship Class.
- Provide a descriptive name for the relationship, like PriOH_Conductorinfo.
- Select the origin table, either PriOHElectricLineSegment or SecOHElectricLineSegment.
- Select CONDUCTORINFO as the destination table. Click Next.
- Select Simple (peer to peer) relationship. Click Next.
- Enter "Conductor Information" in the first field and "Primary Overhead Conductor" or "Secondary Overhead Conductor" in the second field depending on the relationship you are setting up.
- Select None for the direction of messages. Click Next.
- Select the 1 - M (one to many) option. Click Next.
- Select No for adding attributes to the relationship class. Click Next.
- Select OBJECTID for the primary key and either PRIOHCONDUCTOROBJECTID or SECOHCONDUCTOROBJECTID for the foreign key depending on the relationship you are setting up. Click Next.
- Review the summary of the class. Click Finish.
- Repeat for the other table.
ConductorInfo
For the Export to OHDA tool in ArcFM to correctly identify cable types, you will need to add the CONDUCTORINFO model name to the Electric Object Class Model Name domain:
- Open your geodatabase in ArcCatalog.
- Navigate to the CONDUCTORINFO table.
- Right-click the table and select ArcFM Properties Manager.
- On the Model Names tab, select Electric Object Class Model Name from the Model Name Domain drop-down list.
- If CONDUCTORINFO is not in the Selected column, double-click it in the Available column to move it over.
- Click OK or continue with the following steps.
For the Export to OHDA tool to pick up the selected conductor's size and material, you will need to add CONDUCTORMATERIAL and CONDUCTORSIZE to the Electric Field Model Name domain:
- Open your geodatabase in ArcCatalog.
- Navigate to either of these tables.
- Right-click the table and select ArcFM Properties Manager.
- On the ModelNames tab, select Electric Object Class Model Name from the Model Name Domain drop-down list.
- If CONDUCTORMATERIAL is not in the Selected column, double-click it in the Available column.
- Repeat steps 3 - 5 for the other table.
- Click OK or continue with the following steps.
SupportStructure
For the Export to OHDA tool in ArcFM to correctly select support structures for export, you will need to add the OVERHEADSTRUCTURE model name to the Electric Object Class Model Name domain:
- Open your geodatabase in ArcCatalog.
- Navigate to the SupportStructure table.
- Right-click the table and select ArcFM Properties Manager.
- On the Model Names tab, select Electric Object Class Model Name from the Model Name Domain drop-down list.
- If OVERHEADSTRUCTURE is not in the Selected column, double-click it in the Available column to move it over.
- Click OK or continue with the following steps.
For the Export to OHDA tool to pick up the selected support structure's class, height, and material, you will need to add CLASS, HEIGHT, and MATERIAL to the Electric Field Model Name domain:
- Open your geodatabase in ArcCatalog.
- Navigate to the SupportStructure table.
- Right-click the table and select ArcFM Properties Manager.
- On the Field Model Names tab, select the CLASS Field Name in the Fields section.
- In the Field Model Names section, select Electric Field Model Name from the Model Name Domain drop-down list.
- If CLASS is not in the Selected column, double-click it in the Available column to move it over.
- Repeat steps 3 - 5 for the HEIGHT and MATERIAL field names instead of CLASS.
- Click OK.
For pole material to be recognized by OHDA, you will also need to add the correct domain to the material field name:
- Open your geodatabase in ArcCatalog.
- Navigate to the SupportStructure table.
- Right-click the table and select Properties.
- On the Fields tab, select Material in the Field Name column.
- In the Field Properties section, select the Domain you want applied to the feature (e.g., Pole Material Wood) from the drop-down list in the right-hand column.
- Click OK.
You can also add an AssetID field model name to the SupportStructure table to label poles in a profile with any field you choose:
- Add the AssetID to the domain.
- Open your database in ArcCatalog.
- Right-click the database and select Properties.
- On the Domains tab, select Designer Field Model Name.
- In the Coded Values section, add AssetID to both the Code and Description columns.
- Click OK.
- Associate AssetID with the appropriate field.
- Navigate to the Support Structure feature class in your database.
- Right-click the Support Structure feature class and select ArcFM Properties Manager.
- On the Field Model Names tab, select FacilityID. You do not have to use the FacilityID field, but the field you choose must be of type Text or Long Integer.
- In the Field Model Names section, select Designer Field Model Name from the Model Name Domain drop-down list.
- Double-click AssetID in the Available column to move it to the Selected column.
- Click OK.
Finally, you will need to create a relationship class between SupportStructure and Assembly:
- Open your geodatabase in ArcCatalog.
- Select File > New > Relationship Class.
- Provide a descriptive name for the relationship, like SupportStructure_Assembly.
- Select SupportStructure as the origin table.
- Select ASSEMBLY as the destination table. Click Next.
- Select Composite relationship. Click Next.
- Enter "Assembly" in the first field and "SupportStructure" in the second field.
- Select Forward (origin to destination) for the direction of messages. Click Next.
- Select the 1 - M (one to many) option. Click Next.
- Select No for adding attributes to the relationship class. Click Next.
- Select OBJECTID for the primary key and STRUCTUREOBJECTID for the foreign key. Click Next.
- Review the summary of the class. Click Finish.
Assembly
For the Export to OHDA tool in ArcFM to correctly identify assemblies, you will need to add the ASSEMBLYCODE field model name to the Designer Field Model Name domain:
- Open your geodatabase in ArcCatalog.
- Navigate to the ASSEMBLY table.
- Right-click the table and select ArcFM Properties Manager.
- On the Field Model Names tab, select the Field Name to use for matching assemblies on import (FRAMINGTYPE is the default). This field must have a domain. OHDA will attempt to match this field with the value of the GIS Matching String field in Assembly Creator.
- In the Field Model Names section, select Designer Field Model Name from the Model Name Domain drop-down list.
- If ASSEMBLYCODE is not in the Selected column, double-click it in the Available column to move it over.
- Click OK.
In addition to ASSEMBLYCODE, you will also need the ASSEMBLY model name on the Assembly object class:
- Right-click your database in ArcCatalog and select Properties.
- On the Domains tab, select Electric Object Class Model Name.
- In the Coded Values section, add "Assembly" as a code with "Assembly" as its description. Click OK.
- Right-click the Assembly table in ArcCatalog. Select ArcFM Properties Manager.
- On the Model Names tab in ArcFM Properties Manager, select Electric Object Class Model Name from the Model Name Domain drop-down list.
- If ASSEMBLY is not in the Selected column, double-click it in the Available column to move it over.
- Click OK.
To create custom assemblies in ArcGIS that will export to OHDA, you will need to edit the domain of the field you selected to match the assembly's GIS Matching String created in Assembly Creator:
- Open your geodatabase in ArcCatalog.
- Navigate to the ASSEMBLY table.
- Right-click the table and select Properties.
- On the Subtypes tab, click the Domains button.
- Select the Domain Name for the field you have chosen (Assembly Framing Type is the default domain for FRAMINGTYPE).
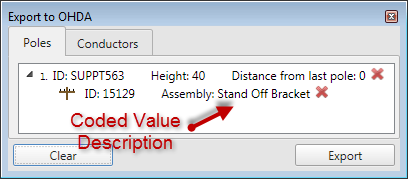
- In the Coded Values section, click a blank line and enter the Code and Description for the assembly. OHDA will attempt to match the Description with the assembly's GIS Matching String field.
- Click OK to save changes and exit the form. Click Apply to save changes and add more Codes and Descriptions.