Use these steps to create a Responder Windows Service for each active cluster group in your active/active cluster and to create the resource that allows Responder to work with a cluster. If you have an active/passive cluster set up you can skip to the next set of steps using the Failover Cluster Manager.
- Create a batch script that creates a Responder Windows Service for each virtual server. You may cut and paste the code below to create a batch script. The portion that begins "sc" and ends with the DisplayName value must be repeated in the batch script for each virtual server. The sample below is for two virtual servers: Responder1 and Responder2. Your script may include additional servers. There are two values in this section that must be edited for each virtual server:
Responder Windows Service: The first highlighted area (yellow) in the sample below is the name of the Responder Windows Service. The Service Name for each virtual server must be unique. Make note of these names as they will be necessary when creating a resource in later steps.
DisplayName: The second highlighted area (blue) is the name that will appear in the Services window (Computer Management). To avoid confusion, create a DisplayName that is similar to the Service Name.
@echo off

set RXWS_INSTALL_DIR=%ProgramFiles(x86)%\Miner and Miner\Responder\Server

sc create responder1 binPath= "%RXWS_INSTALL_DIR%\Miner.Responder.WindowsService.exe"
type= own start= demand error= normal depend= msmq obj= "NT AUTHORITY\NetworkService" DisplayName= "Responder 1"

sc create responder2 binPath= "%RXWS_INSTALL_DIR%\Miner.Responder.WindowsService.exe"
type= own start= demand error= normal depend= msmq obj= "NT AUTHORITY\NetworkService" DisplayName= "Responder 2"

pause
|
- Run the batch script on every node (physical server) in the server cluster. This places a Responder Windows Service on each node in the server cluster for all virtual servers that could failover to that node.
- Using the Failover Cluster Manager, create an active/active cluster (see the Server Clustering page for information and contact your IT support respresentative with any questions).
Next you will create the resource for the Responder Windows Service using the Failover Cluster Manager. These steps make the Responder server work with a cluster.
- Within the cluster, right-click Services and applications.
- Select More Actions, then Create Empty Service or Application. A new service is added. For the purposes of this documentation, and to keep instructions succinct, this will be referred to as a Cluster Group.
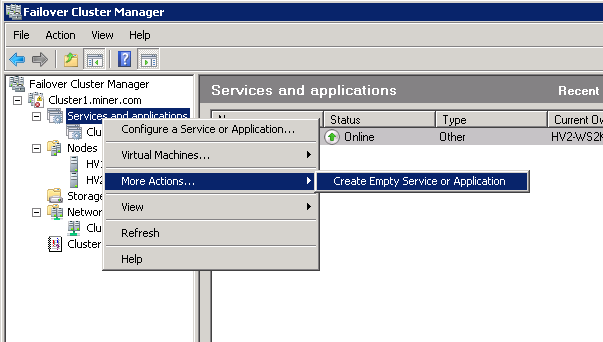
- Right-click the new cluster group and select Rename. Rename this cluster group for identification purposes (such as RxCG1, for this example, i.e., Responder Cluster Group 1).
- Right-click RxCG1 and select Add a Resource, then Client Access Point.
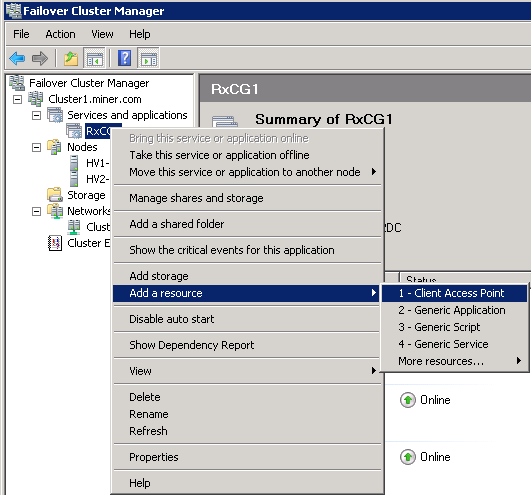
- The New Resource Wizard appears and guides you through the process. Enter the network name (we recommend matching the cluster group name: RxCG1) or IP, and click Finish when done.
- Right-click RxCG1 and select Add storage. Select the unused storage drive.
- Right-click RxCG1 and select Add a resource, More resources, then Add Message Queuing.
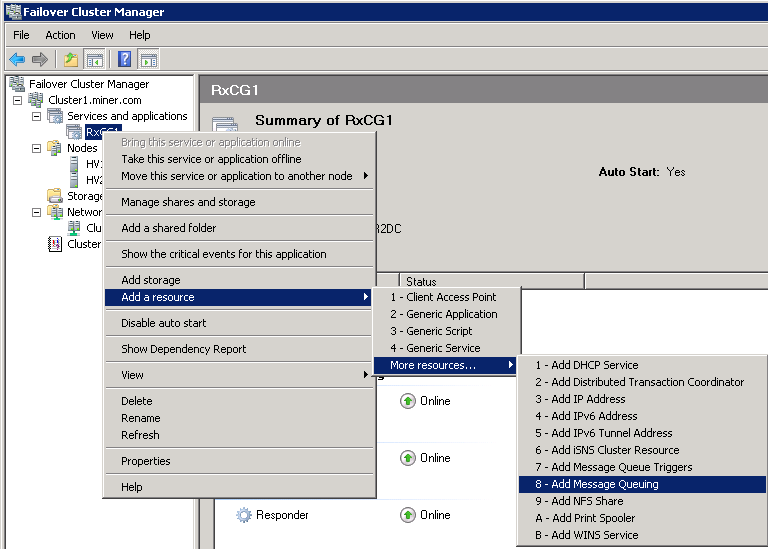
- The MSMQ requires three dependencies. To add these:
- Right-click the Message Queue and select Properties.
- Select the Dependencies tab.
- Add the Storage Resource, Cluster Group Name (RxCG1), and Service IP that was created in the steps above.
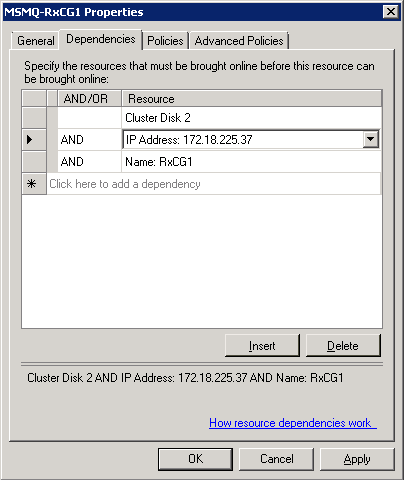
- Click OK.
- Right-click RxCG1 and select Add a Resource, then Generic Service.
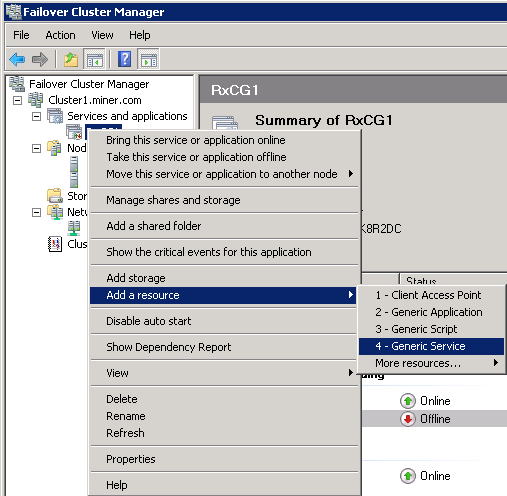
- From the list of services, select Responder 1 (or the first DisplayName you assigned from the batch script (highlighted in blue) at the top of this topic). Complete the remaining steps of the wizard. Click Finish.
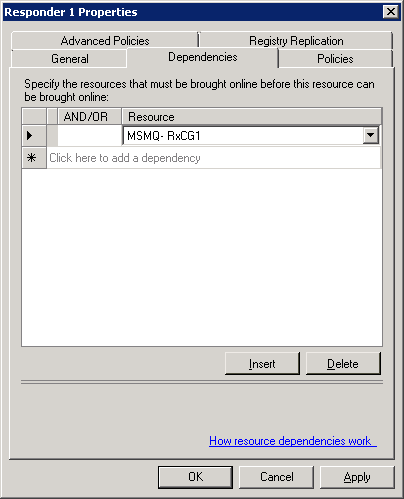
- The Responder 1 service requires the MSMQ cluster as a dependency. To add this:
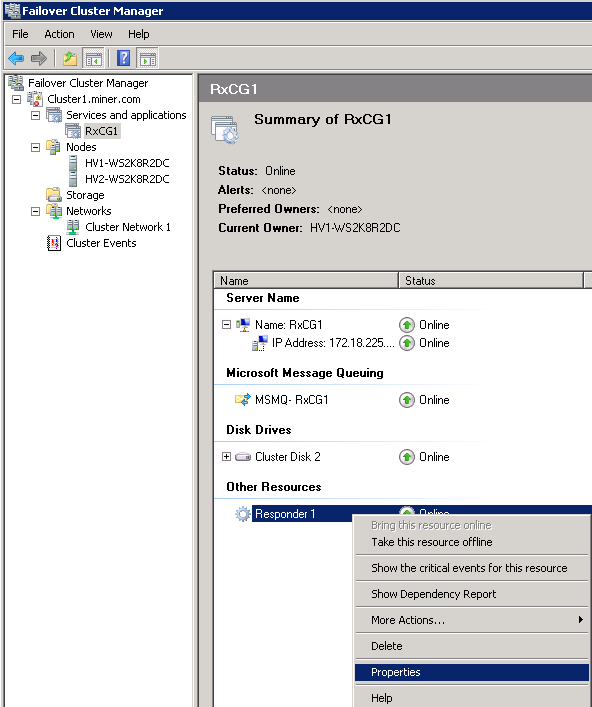
- Right-click the Responder 1 service and select Properties.
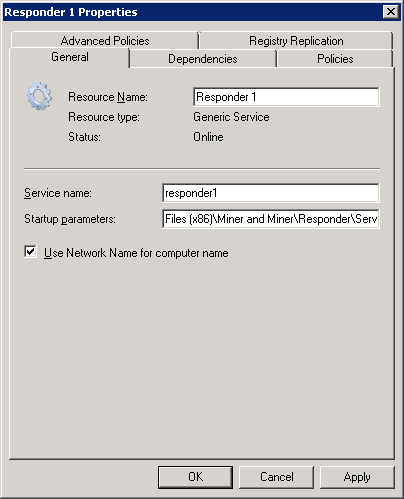
- On the General tab, ensure the Use Network Name for computer name check box is selected.
- Select the Dependencies tab.
- Add the Message Queue created in the steps above (MSMQ-RxCG1).
- Click OK.
- Repeat Steps 1-11, as needed, to create additional cluster groups (RxCG2, RxCG3, etc.) and assign the Generic Service Resource that corresponds, created from the batch script (Responder 2, Responder 3, etc.).
- Open Miner.Responder.WindowsService.exe.config. By default this file is installed here: Program Files (x86)\Miner and Miner\Responder\Server\.
- Look for the following line of XML:
|
Copy Code
|
<WebServer Enabled="true" Port="7997" VirtualPath="/" AllowRemoteRequests="false"/>
|
- If it does not already exist on this line, add a FallbackPorts attribute to this tag. The FallbackPorts value supports deliminated values (7998 7999 8000), ranges (7998-8000), and a combination of both (7999 8500-8550 9000). The Responder Windows Service web page uses this value. Your finished tag may look like this:
<WebServer Enabled="true" Port="7997" FallbackPorts="7998 8200-8300 9000 9340" VirtualPath="/" AllowRemoteRequests="false"/>
Responder looks first for the Port value. If that port is not available, it looks for those listed in the FallbackPorts attribute.
- Save and close Miner.Responder.WindowService.exe.config.
Optional steps for Query Services users
- Browse to and open Miner.Responder.QueryWindowsService.exe.config. You can use a text editor (e.g., Notepad) to edit this file.
 |
Do not use a word processing program such as WordPad or Microsoft Word to edit XML files because they can corrupt your configuration file. |
- Edit the <wellknown> tag defined inside the <client> tag to point Query Services to Data Services. By default, the url attribute of the <wellknown> tag points to the localhost using a period (.). Replace this period with the cluster name ({ComputerName} replaces the period in the following example).
| Edit wellknown tag |
Copy Code
|
<client>
   <wellknown type="Miner.Responder.Shared.IDataServices, Miner.Responder.Shared" url="msmq://FormatName:DIRECT=OS:{ComputerName}\private$\rxserver/DataServices.rem" />
</client>
|


