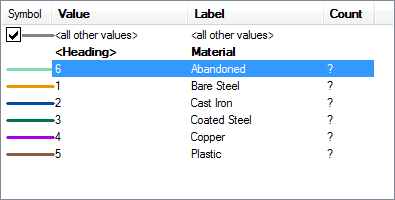
When you create an Abandon subtype, its symbology will default to match the symbology of the subtype called "all other values." To change the symbology, you need to add values to the symbology tab of the layer.
Designer Users: Skip to the steps at the end of this page.
- Right-click the feature class in the table of contents (e.g., List By Drawing Order) and select Properties.
- Click the Symbology tab.
- From the Show menu on the left, select and option under Categories or Multiple Attributes.
- Click the Add Values button.
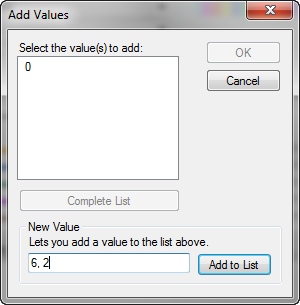
- Select the value to be added and click OK. The dialog shows the numbers corresponding to the values. For example, when the Abandoned subtype was created it was the sixth subtype and has a corresponding numerical value of 6.
- If the value you want to add is not in the Select Values to Add list, enter the numerical value in the New Value field and click Add to List. Select the value in the top list and click OK. You can then select the Label field for your new value and give it a non-numerical label.
- The Abandoned subtype is added to the list.

- You can double-click the symbology to change it.
- Click OK to save your changes and dismiss the dialog.
Steps for Designer Users
Designer displays a feature's symbology differently based on its Work Function.
- Right-click the feature class in the table of contents (e.g., Display tab) and select Properties.
- Click the Symbology tab.
- In the Show field at the left side of the screen, select Unique Values, Many Fields (under Categories).
- You will see three Value fields. The first two will be populated. In the example below, the first (Material) is the feature's subtype. The second is the feature's Work Function. The values you enter must correspond with these fields.

Figure 1, Value Fields
- Click Add Values.
- In the New Value text box, enter the values that fall within the domains for the fields that appear in the Value fields (Figure 1). In the example below, 6 corresponds with Abandon in the Material domain and 2 corresponds with Remove in the Work Function domain.

Figure 2, Add Values
- Click Add to List. When you have finished adding values, click OK to save your changes and dismiss the dialog.
- You may click the value in the Label field to edit.

- Click OK to dismiss the Layer Properties dialog.


