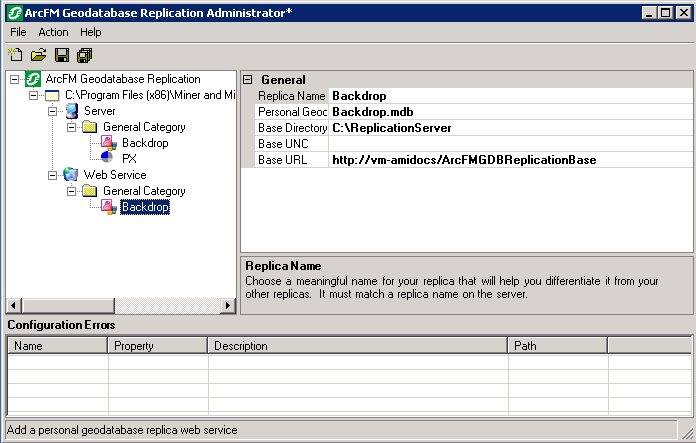
Mobile Users: Follow the steps below to create a web service for your Backdrop database.
Note that the Web Service configuration is in a different file than the Server configuration.
Follow these steps to configure the Replication web service for your geodatabase replica. A configured, read-only sample file is installed at this location: C:\Inetpub\wwwroot\ArcFMGDBReplicationService\Sample.Web.config. This directory also contains an empty version of the Web.config file. Whether you modify the sample or use the empty Web.config file, it MUST have the name Web.config and it MUST reside in the C:\Inetpub\wwwroot\ArcFMGDBReplicationService directory. A replication file by any other name will not be recognized.
- Open the ArcFM Geodatabase Replication Administrator (Start menu > ArcFM Solution > ArcFM Geodatabase Replication).
- You may create a new configuration file or use the empty file provided. Regardless, this file MUST be named Web.config. It must also reside at this location: C:\Inetpub\wwwroot\ArcFMGDBReplicationService\
- To Create a new configuration file, right click the ArcFM Geodatabase Replication node and select New Configuration File. Select the configuration node. The ConfigurationFile field to the right establishes the name and location of your configuration file. Browse to the location in which your configuration file should be stored (see Step 2). Name the file Web.config and click Save.
- To Open an existing configuration file, click the Open Existing Configuration File
 button and browse to the Web.config file.

Each configuration file has three sections: Client, Server, Web Service. Each section must be created on its corresponding machine. The Client and Server sections reside in the ReplicationConsole.exe.config file. The web section resides in the Web.config file.
- Right click the configuration node and select New > Web Service. This creates a Web Service node and a category.
Categories: You may right click the Web Service node and select New > Category to create additional categories. Create as many categories as necessary to organize your replicas (e.g., by zip code). Right click the category and select Rename or enter a new name in the Category Name at the right. This applies to client, server, and web service categories.
- Select the Web Service node to display the Log Client Activity field. This setting specifies whether to log client replication activity. When set to True, it maintains a log of which replication clients retrieved which replicas. The log is stored in the Replication directory on the server (e.g., ReplicationServer). When set to False, no data is logged.
- Right click the category and select New > File Geodatabase Replica or New > Personal Geodatabase Replica. You may add as many replicas as necessary to each category.
- Select the geodatabase and set values for the settings to the right.
- Replica Name: Assign a name to the replica. This name must contain fewer than 50 characters and it must be the same for the corresponding replica in the Server and Client sections.
- File/Personal Geodatabase Name: Browse to the geodatabase (file or personal) that requires the update. You may be prompted to enter login information to access the geodatabase.
- Base Directory: Enter the base directory on the Replication Server (e.g., ReplicationServer). This is the directory created in the Create Base Path step. Mobile Users: This path was created in the Set Up Directory Structure step.
- Base UNC: If you're using UncCopy to transmit delta files to the client, enter the Base Path directory. This value is passed to the client in order for it to access the server base path. Therefore, this value MUST be a UNC path, regardless of whether the base path is local to the Web Server. For example: \\Madison\ServerBase
- Base URL: If you're using Bits to transmit delta files to the client, enter the URL that points to the virtual directory on the web server. For example, http://Madison/ServerBase (Madison is the local machine name).

- When you've finished configuration, select File > Save Configuration File. You may also click the red X button in the top right corner. In this case you will be prompted to save changes. Changes cannot be saved if errors exist.
An asterisk (*) next to "ArcFM Geodatabase Replication Administrator" in the titlebar indicates that modifications have been made since the last save.


 button and browse to the Web.config file.