You can use the Feeder Sync Tool to leverage the benefits of Feeder Manager 2.0 while still regularly updating the FeederID, FeederID2, and FeederInfo fields after the user has finished editing data interactively. A list of edited features is stored in the MM_EDITED_FEATURES table, allowing the FM1 fields to be updated later when the user is not actively using the application. The application can be configured to update the FM1 fields when the session is posted, with a GDBM action handler, or by developing a custom feeder sync module. Developer samples are available in a zip file here.
 |
If you have not already done so, you will need to run Create/Update ArcFM Solution System Tables on your database before completing any steps below. The Create/Update ArcFM Solution System Tables tool is found on the ArcFM menu in ArcCatalog. This process will create the MM_EDITED_FEATURES table that the Feeder Sync Tool uses. The MM_EDITED_FEATURES table should have the following permissions:
| Table |
Role |
Privileges |
| MM_EDITED_FEATURES |
MM_ADMIN |
SELECT, INSERT, UPDATE, DELETE |
| MM_EDITED_FEATURES |
MM_USER |
SELECT, INSERT, UPDATE, DELETE |
|
Using the Feeder Sync Tool When Posting (Default Configuration)
- In ArcCatalog, right-click your Electric Geometric Network and select Configure Feeder Manager.
- From the Feeder Manager configuration window:
- Clear the Feeder Manager 1.0 option (if enabled).
- Select the Feeder Manager 2.0 option.
- Expand the Advanced Configuration options. Select the Feeder Manager 1.0/Feeder Manager 2.0 Field Sync option.
- Optionally set the Enable autoupdaters during field sync option to allow autoupdaters to fire during field synchronization.
- Set the Target version for sync (SDE.DEFAULT by default).
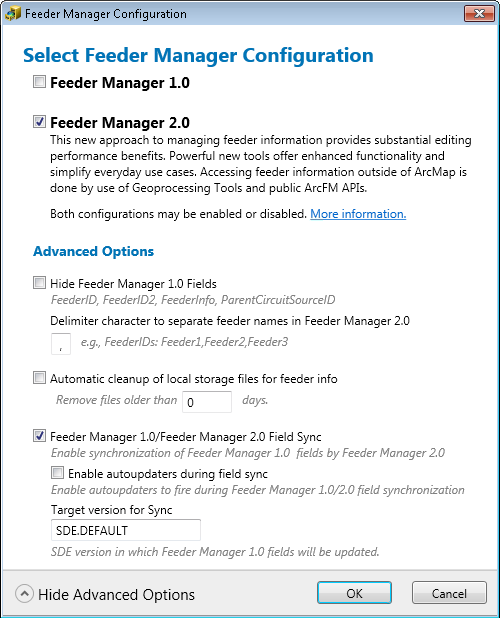
- Click OK.
- Create or open a session or design in ArcMap.
- Perform typical editing operations (create/delete features, editing existing features, etc.) in that session or design.
- Notice that the Feeder Information fields from Feeder Manager 2.0 update after each edit (Feeder IDs, Subfeeder IDs (if applicable), Energized Phases, Number of Feeders, Loop, Tie Device).
- Notice that the feeder information in the legacy fields (FeederID, FeederID2, and FeederInfo) do not update after each edit.
- Save the session or design. This will populate the MM_EDITED_FEATURES table.
- You can add the MM_Edited_Features table to inspect its contents if necessary.
- Post the session or design to SDE.DEFAULT. The former Feeder Manager 1.0 fields now populate with the new feeder information (FeederID, FeederID2, and FeederInfo).
Using Feeder Sync with Geodatabase Manager (GDBM)
- Configure the Feeder Sync Tool via the Feeder Manager Configuration window.
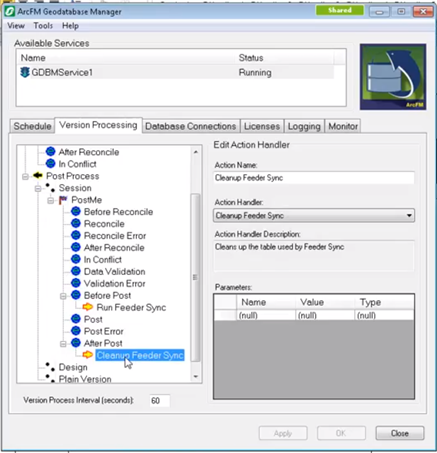
- Add the following Action Handlers for the Feeder Sync Tool to your existing GDBM configuration (see the Tasks topic for more information):
- Run Feeder Sync assigned to Before Post.
- Cleanup Feeder Sync assigned to After Post.
- Once GDBM has been properly configured for the Feeder Sync Tool, open ArcMap and create a new Session or Design.
- Perform typical editing operations (create/delete features, editing existing features, etc.) in that session or design.
- Notice that the Feeder Information fields from Feeder Manager 2.0 update after each edit (Feeder IDs, Subfeeder IDs (if applicable), Energized Phases, Number of Feeders, Loop, Tie Device).
- Notice that the Feeder Information in the legacy fields (FeederID, FeederID2 and FeederInfo) does not update after each edit.
- Save the session or design. This populates the MM_EDITED_FEATURES table. You can add the MM_EDITED_FEATURES table to inspect its contents if necessary.
- Send the Session or Design to the GDBM Post Queue.
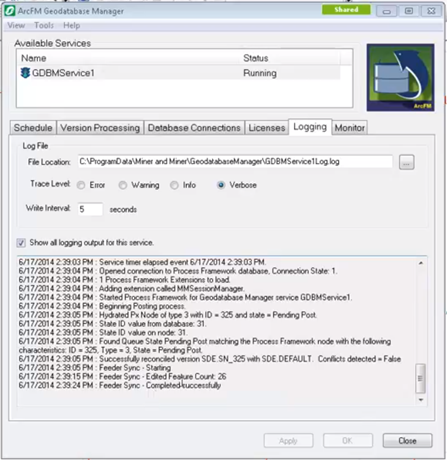
- After GDBM runs through the posting process you can inspect the Logging tab for information on the number of features synced and if it was completed successfully.
- Open your SDE.Default version in ArcMap and inspect the legacy FeederID, FeederID2, and FeederInfo fields to see that they have been updated.