Responder Mobile Configuration Guide
Configure MobileServices Web Service
| Responder Mobile > Configure MobileServices Web Service |
The MobileServices web service manages synchronization between the field machine and the SQL Server Express database. Perform the following steps to configure this web service.
 |
The Responder Mobile Web must be installed on the same machine as the Responder Mobile Server. |
If you are using Windows Server 2003, you will need to create an application pool before continuing with the steps below.
|
Copy Code
|
|
|---|---|
<ServerSyncSettings DataSource="Machinename\SQLEXPRESS" DatabaseName="ResponderDatabase"/> |
|
|
Copy Code
|
|
|---|---|
    <bindings>
      <basicHttpBinding>
        <binding name="Binding1"
                 maxReceivedMessageSize = "2147483647">
          <security mode="None">
          </security>
        </binding>
      </basicHttpBinding>
    </bindings>

    <!--<bindings>
      <basicHttpBinding>
        <binding name="Binding1"
                 maxReceivedMessageSize = "2147483647">
          <security mode="TransportCredentialOnly">
            <transport clientCredentialType="Windows"/>
          </security>
        </binding>
      </basicHttpBinding>
    </bindings>

    <bindings>
      <basicHttpBinding>
        <binding name="Binding1"
                 maxReceivedMessageSize = "2147483647">
          <security mode="Transport">
            <transport clientCredentialType="Basic"/>
          </security>
        </binding>
      </basicHttpBinding>
    </bindings>-->
|
|
|
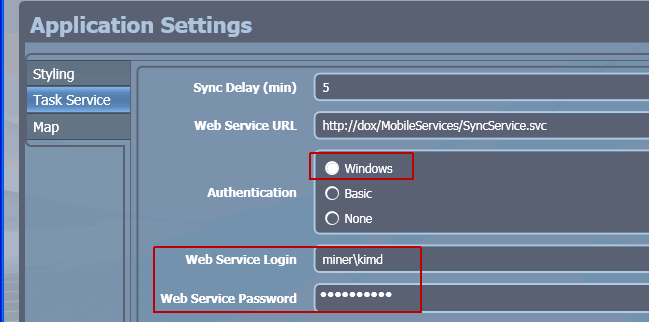
Authentication is also selected during configuration of the Mobile field machines. The authentication type selected on the client machines MUST match the authentication type selected in Web.config. |
Windows Server 2003
If you are running on an XP machine, you can skip to the section below (Identify Web Service URL). If you are running MobileServices on a Windows Server 2003 machine, perform the steps below.
Identify Web Service URL
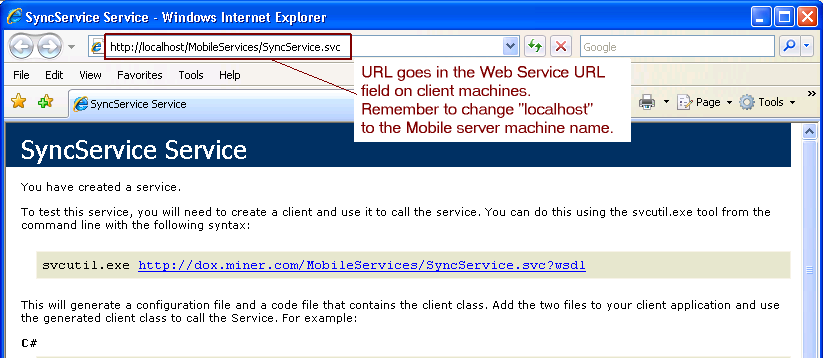
When configuring the client machines, you will need to enter the web service URL. Follow the steps below to get this URL.
The URL in the address field is the URL required for the client machine configuration. Be sure to replace "localhost" with the name of the server on which the web service resides before entering this information into the Web Service URL field on the client machine.
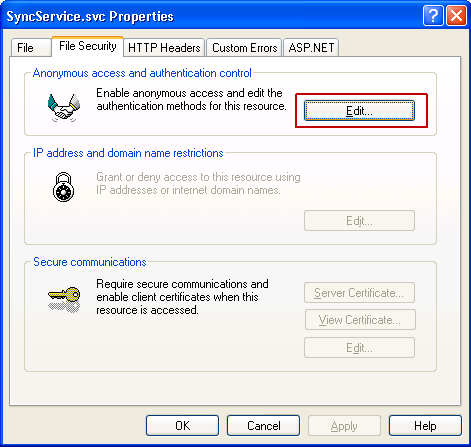
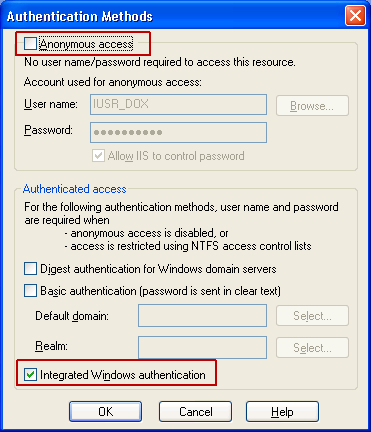
Windows Authentication
If you are implementing Windows authentication, you must also modify the web service's security properties.
 |
If the Web Service Login and Password fields are populated, the user MUST login with the user name/password entered. If a different user name/password are used, Responder Mobile will not function properly. These fields are required with Windows and Basic authentication. |