Configuring Responder/Smart Grid
Set Up Oracle Database

Resource Center Home

Before starting AMI configuration, you will need to run several scripts that generate tables as well as configure existing tables to support AMI events. Follow the steps on this page to run these scripts.

By default, the scripts are installed in the following location: C:\Program Files (x86)\Miner and Miner\Responder\Developer Resources\Implementation Scripts\Oracle\Addons.

The first script (SmartGridAMI_01_ConfigureServicePoints.bat) converts a field on the ServicePoint feature class to use Esri's ST_Geometry data type. Your geodatabase must be configured to support ST_Geometry data types. This applies only to Oracle databases.

These scripts must be run in the order listed.

Script Description

SmartGridAMI_01_ConfigureServicePoints.bat

Configures the ServicePoint (or equivalent) feature class for use with AMI objects.

SmartGridAMI_02_CreateStateStore.sql

Script requires modification. Creates the schema for AMI state store.

SmartGridAMI_03_LoadStateStore.sql

Script requires modification. Loads the AMI state store from the Responder RX_CUSTOMERS table and the ServicePoint_ST feature class.

SmartGridAMI_04_RegisterAMIEvents.bat

Configures the necessary ArcSDE components necessary to support AMI events.

SmartGridAMI_05_CreateConfigStore.sql

Creates the Configuration table for centralized configuration.

SmartGridAMI_05a_LoadEventMapping2010.sql

Run this script only if you are implementing Responder AMI 10.0.2, which leverages the event types defined in the CIM 61968-9 standard tested in the January, 2010. Do not run this script if you have run or plan to run other scripts that load event types (for example, SmartGridAMI_05a_LoadEventMapping201111.sql).

SmartGridAMI_05a_LoadEventMapping201111.sql

Run this script only if you are implementing Responder AMI 10.0.3 or greater, which leverages the event types defined in the CIM 61968-9 2nd Ed. standard tested in November, 2011. Do not run this script if you have run or plan to run other scripts that load event types (for example, SmartGridAMI_05a_LoadEventMapping201110.sql).

SmartGridAMI_06_LoadConfigStore.sql

Loads initial values for centralized configuration.

SmartGridAMI_07_LoadConfigRole.sql

Creates the Smartgrid Administrator role and assigns it to the administrator user.

SmartGridAMI_08_RefreshStateStore.sql

Refreshes the state store based on changes that may have occurred in the ServicePointFeature class or the RX_CUSTOMERS table.

Disassociate ST_Domain_Operators Package

This is not a script, but a set of steps outlined at the bottom of this page. These steps disassociate the st_domain_operators package from the st_domain_stats statistics type.

Use the following steps to run the scripts listed above. Use an application such as SQL Plus to execute these scripts.

Before you begin the set-up process using the scripts described on this page, it is important to first make a backup of the database.

Configure Service Points

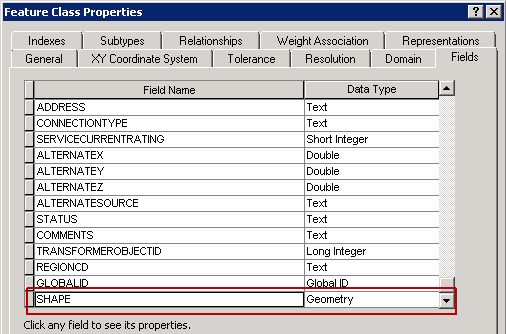
This script configures the ServicePoint feature class. 

This script will break any existing views based on the ServicePoint feature class. These should be dropped before starting and created after AMI configuration is complete.

This script has a few pre-requisites:

Follow the steps below to execute the script:

  1. Double-click the SmartGridAMI_01_ConfigureServicePoints.bat script to execute it.
  2. You will be prompted to indicate whether your system meets the pre-requisites listed above. Press y on the keyboard to continue or n to stop the script. Press Enter.
  3. Next you will be prompted to review the information you'll need to proceed. If you have the data required, press y on the keyboard to continue or n to stop the script. Press Enter.
    • Name of the feature class that stores service points
    • Port number or direct connect string for the geodatabase
    • ArcSDE server name
    • Database owner of the ServicePoint feature class: user name and password
    • Database owner of the AMI tables
    • Name of the existing multi-versioned view against the ServicePoint feature class (if it exists)
  4. Next you'll be prompted to enter each piece of information listed above. Press Enter on the keyboard after each.
  5. After entering all pieces of information, you will be prompted to confirm that the information is correct. Press y on the keyboard to continue or n to stop the script. Press Enter.
  6. Next, the script will migrate the geometry type of the feature class you entered (e.g., ServicePoint). When the migration is complete, double-check to ensure the migration was successful. Open ArcCatalog and view the Properties window for the ServicePoint (or equivalent) feature class.
  7. Select the Fields tab and scroll to the SHAPE field. The Data Type should be set to Geometry.

  1. The script will prompt you to indicate whether the SHAPE field on the ServicePoint feature class was successfully set to geometry. Press y on the keyboard to continue or n to stop the script. Press Enter.
  2. Next, the script will create a multi-versioned view on your ServicePoint (or equivalent) feature class if one doesn't already exist. The first prompt will ask you if a multi-versioned view already exists. Press y on the keyboard if the new already exists. Press n if it does not. Press Enter.

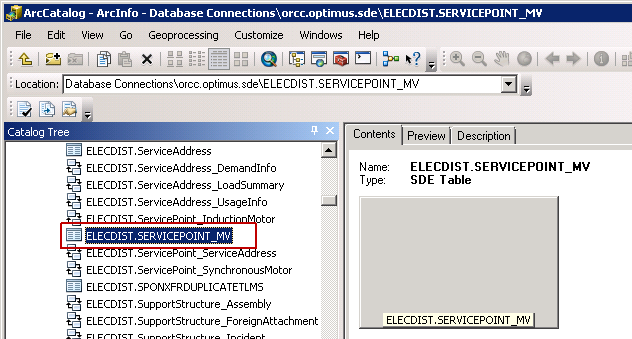
Do I have a multi-versioned view?

In ArcCatalog, look for an object named similarly to your ServicePoint feature class. This object will likely have a suffix of _MV. This object will not reside in the dataset next to the ServicePoint feature class, but rather in the root of the geodatabase.

In the example below, the multi-versioned view is named ELECDIST.SERVICEPOINT_MV. The feature class used to create this view is called ELECDIST.SERVICEPOINT.

If you don't see a view named like this in the geodatabase, you may need to query the database. Below is a sample query:

select imv_view_name

from dbowner.table_registry

where owner='TableOwner'

and table_name='SERVICEPOINT'

/

  1. If you responded no (n) to indicate that a multi-versioned view does not exist, the script will attempt to create this one for you. Once it has finished, the script will prompt you to indicate whether the view was created successfully. Press y if it did or n if it did not. Press Enter. Skip to step 13.
  2. If you responded yes (y) to indicate that a multi-versioned view does exist, then you will be prompted to enter the name of that view. Press Enter.
  3. The script will grant the appropriate permissions to this multi-versioned view. When it has finished, it will prompt you to indicate whether the permissions were granted successfully. Press y if they were or n if they were not. Press Enter.
  4. Next, the script will retrieve parameters for the Create State Store and Load State Store scripts. Press any key to continue the script.
  5. The script will provide additional instructions. Press any key to continue.
  6. The script will provide a sample list of information. This is just a sample. Press any key to continue.
  7. Next the script will present the actual list of information that you will need. Make note of the following for future steps:
    • Auth SRID value: Update the LoadStateStore scripts with this value in later steps.
    • Spatial Index value: Update the LoadStateStore script with this value in later steps. Make note of the  number (e.g., 234.26326642411).
    • Multi-versioned view name: Update the CreateStateStore script with this name in later steps.
  8. Press any key to exit.


Create State Store

This script creates the AMI tables in the geodatabase. The following pre-requisites exist:

Before executing this script, you'll need the following information.

To edit and then execute this script, follow the steps outlined below.

  1. Right-click SmartGridAMI_02_CreateStateStore.sql and select Edit to open this file for editing.
  2. Look for the following:
/* SET THESE VARIABLES PER SmartGridAMI_01_ConfigureServicePoints.bat OUTPUT! */
SERVICEPOINT_OWNER varchar2(160):='ELECDIST';
RX_CUSTOMERS_OWNER varchar2(160):='RESPONDER';
MULTIVERSIONED_VIEW_NAME varchar2(32):='SERVICEPOINT_MV';
AMI_DATA_TABLESPACE varchar2(30):='SMARTGRID';
AMI_INDEX_TABLESPACE varchar2(30):='SMARTGRID';
  1.  In the above section, you'll need to indicate the following:
    • SERVICEPOINT_OWNER: This is the user that owns the ServicePoint feature class.
    • RX_CUSTOMERS_OWNER: This is the user that owns the RX_CUSTOMERS table. In most instances this will be the Responder user.
    • MULTIVERSIONED_VIEW_NAME: This is the name of the multi-versioned view created or updated by the first script.
    • AMI_DATA_TABLESPACE: This is a location in the geodatabase where data may be stored. Contact your DBA for this tablespace name.
    • AMI_INDEX_TABLESPACE: This is a location in the geodatabase where data may be stored. Contact your DBA for this tablespace name.
  2. Save and close SmartGridAMI_02_CreateStateStore.sql.
  3. Login as the owner of the AMI tables (e.g., smartgrid) and execute SmartGridAMI_02_CreateStateStore.sql. You can execute the script using applications such as SQL Plus.


Load State Store

Values in the Meter field of the RX_CUSTOMERS table must be unique. Before executing this next script, ensure that there ar no duplicate values in this field. Before executing SmartGridAMI_03_LoadStateStore.sql, you'll need the following information.

Follow the steps below to edit the SmartGridAMI_03_LoadStateStore.sql script before executing it.

  1. Open SmartGridAMI_03_LoadStateStore.sql and edit the following values:  

/* SET THESE VARIABLES PER SmartGridAMI_01_ConfigureServicePoints.bat OUTPUT! */
SERVICEPOINT_OWNER varchar2(160):='ELECDIST';
RX_CUSTOMERS_OWNER varchar2(160):='RESPONDER';
AUTH_SRID number:=4;
SPATIAL_INDEX number:=234.26326642411;

  1. Enter the owner of the ServicePoint feature class.
  2. Enter the owner of the RX_CUSTOMERS table.
  3. Enter the Auth SRID value.
  4. Enter the spatial index grid size. You only need to enter the number (e.g., 234.26326642411).
  5. Save and close SmartGridAMI_03_LoadStateStore.sql.
  6. Login as the owner of the AMI tables (e.g., smartgrid) and execute the script in an application such as SQL Plus.


Register AMI Events

This script registers the AMI_Events database view as a layer with ArcSDE. It also grants View permissions to the owner of the AMI objects so that it can be viewed in ArcMap. This script requires some modification. The script will prompt you to provide the following information:

Follow the steps below to execute the script:

  1. Double-click SmartGridAMI_04_RegisterAMIEvents.bat to launch it.
  2. You will be prompted to review the script's pre-requisites. If you have successfully run the first two scripts, you have met the pre-requisites. Enter y to contine or n to exit the script. Press Enter on the keyboard.
  3. Next, the script prompts you to review the information you will be prompted to provide. This information is listed just above these steps. If you have all the required information, enter y to continue or n to exit the script. Press Enter on the keyboard.
  4. The script will now prompt you for each piece of information. Enter the value required and press Enter on the keyboard for each.
  5. After entering the required information, you will be prompted to review your entries. If they are accurate, enter y. To make changes, enter n. Press Enter on the keyboard to continue.
  6. Next, the script will inform you that it is about to provide you with the Auth SRID and multi-versioned view name needed for future steps. Press any key to continue.
  7. The next description lets you know where to locate the information you'll need. Press any key to continue.
  8. The script provides you with a sample layer property output where you can see the information you'll need. This is just a sample. Press any key to continue.
  9. Next, the script displays the layer properties from which you can note the following values:
    • Auth SRID
    • Spatial Index Grid Size parameter (Just the number; for example: 234.26326642411)
    • Layer Envelope minx 
    • Layer Envelope maxx
    • Layer Envelope miny
    • Layer Envelope maxy
    • Entities
  10. The script will prompt you to indicate whether the layer properties were displayed successfully. Enter y if the properties were displayed. Enter n if they were not. Press Enter on the keyboard to continue.
  11. Enter the Auth SRID value and press Enter.
  12. Enter the spatial index grid size. This value in the layer properties may look something like this: SPIDX_GRID,GRID0=234.26326642411,FULL. You only need to enter the number (e.g., 234.26326642411). Press Enter the continue.
  13. Next, you'll be prompted to enter the Layer Envelope min/max x/y values. Enter each value and press Enter to continue after each.
  14. Enter the value in the Entities field and press Enter to continue.
  15. After entering the required information, you will be prompted to review your entries. If they are accurate, enter y. To make changes, enter n. Press Enter on the keyboard to continue.
  16. Verify that the layer was successfully registered. Press y if it was; Press n if errors occurred; you will have the opportunity to re-enter values. Press Enter.
  17. Press any key to exit.


Create Configuration Store

This script creates a centralized configuration schema for the Responder AMI integration. Login as owner of the Responder tables (e.g., responder) and run SmartGridAMI_05_CreateConfigStore.sql in an application such as SQL Plus.


Load Configuration Store

This script loads the initial values into the centralized configuration (Configuration Manager) of the Responder AMI integration. The settings this script loads into the Configuration Manager may not be accurate for your system. However, you will modify these initial values in the Configuration Manager in a future step.

Execute the script as the owner of the Responder tables (e.g., responder). You can use an application such as SQL Server Client or SQL Server Management Studio. 


Load Configuration Role

This script creates a Responder security role for the administrator user required by the Responder AMI integration. Login as the owner of the Responder tables (e.g., Responder). Run SmartGridAMI_07_LoadConfigRole.sql in an application such as SQL Plus.


Refresh State Store

This script refreshes the AMI state store table based on changes that may have occurred in the ServicePoint feature class or the RX_CUSTOMERS table. Login as owner of the AMI tables (e.g., smartgrid) and run SmartGridAMI_08_RefreshStateStore.sql in an application such as SQL Plus.


Disassociate ST_Domain_Operators Package

This step should be performed only after all of the previous scripts have been succesfully executed. To disassociate the st_domain_operators package from the st_domain_stats type, execute the following command as the SDE user:

SQL> DISASSOCIATE STATISTICS FROM PACKAGES st_domain_operators;

Esri provides additional information on this process: Disassociate the st_domain_operators from the st_domain_stats type in Oracle.


Send Comment to ArcFMdocumentation@schneider-electric.com