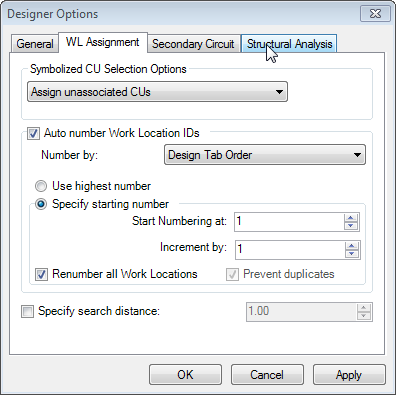
Use the WL Assignment tab in Designer Options to determine how compatible units (CUs) are assigned to work locations.
- From the ArcMap Customize menu, select Designer Options.
- Select the WL Assignment tab.

- Select a Symbolized CU Option: Assign all CUs, Assign unassociated CUs, or Assign Selected Features.
- Assign all CUs: Assigns all CUs to the nearest work location within the search tolerance.
- Assign unassociated CUs: Assigns all CUs without a work location assignment within the search radius to the nearest work location.
- Assign Selected Features: Only assigns the CUs that have been selected to the nearest work location within the search tolerance.
- Select from Work Location auto numbering options including: Design Tab Order or Geographic Location. The Design Tab Order option uses the order as it is shown on the Design tab in the Attribute Editor. The Geographic Location option moves from the currently selected work location to the nearest, etc.
- If you select Use Highest Number, the tool will identify the highest number Work Location ID assigned and begin numbering with the next highest.
- You may select a beginning number and an increment. This allows you to determine the starting number for the work location ID and the increment by which additional IDs are calculated.
- You may elect to Renumber all Work Locations if adding to existing WLs.
- Select the Prevent Duplicates checkbox to ensure no two work locations share the same ID, and all are in numerical order without gaps. For example, map grid IDs 1, 3, 5 and 6 already exist. When the user selects the CU Work Location Assignment button with this option selected, the first map grid is given ID 2, then ID 4, then ID 7, 8, 9, etc. This checkbox is disabled when Renumber All Work Locations is selected.
- Specify a search distance. This is the range a CU must be within to be assigned to the WL.
- Click OK.

