
Using ArcFM Solution Desktop
Export to Overhead Design Analysis
| ArcFM Desktop Overview > Designer > Designer Toolbar > Export to Overhead Design Analysis |
Use the Export to Overhead Design Analysis  tool to designate specific poles, assemblies associated with those poles, and conductors for export into Overhead Design Analysis (OHDA) for evaluation. This button does not appear on a toolbar by default. You may need to add it using the Customize menu.
 |
You do not need an OHDA license to use this tool. When you open OHDA, however, the application will check for a license. |
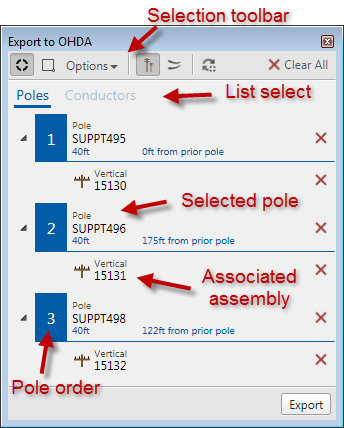
The Export to OHDA Tool's interface is split between two lists of components - Poles and Conductors. Click the names at the top of the form to change lists. The current list is highlighted in blue and underlined.
The numbers with blue square backgrounds designate the order of items on export to OHDA. The numbers for poles also appear on the map. The order of poles can have an impact on your scenario in OHDA, so it is important to ensure this order is correct. See the Pole Order section at the end of this topic for more information.
Adding components
See the Export to OHDA Selection Toolbar table below.
Deleting components
Click the red X next to the component you want to delete. Deleting a pole will also remove any associated assemblies. Click the Clear All button to remove all selected components from both lists.
Reordering a list
Click an item in the list and drag the mouse to rearrange the order.
Highlight list components on the map
Click a list item to briefly highlight the feature in ArcMap.

| Icon | Tool | Description | ||||
|---|---|---|---|---|---|---|
 |
Point Selection | Click to select components one at a time. When active, the icon is highlighted in dark gray. On the map, use the  cursor to select individual components for export. The tool will highlight components in green when you hover the cursor over them. Making this tool active will deactivate Box Selection. cursor to select individual components for export. The tool will highlight components in green when you hover the cursor over them. Making this tool active will deactivate Box Selection. |
||||
 |
Box Selection | Click to select a group of components at once. When active, the icon is highlighted in dark gray. On the map, click and drag the mouse to draw a selection box over the items you want to include in your selection. Use the Pole Ordering Options menu to control the default numbering of poles. Making this tool active will deactivate Point Selection. | ||||
 |
Pole Ordering Options | When using Box Selection, the Options menu is where you set the default numbering of the poles you add to the selection. Select Left to Right, Right to Left, Top to Bottom, or Bottom to Top to control the default numbering of multiple poles in a group selection. See the Pole Order section following this table for more information. | ||||
 |
Pole Select Toggle |
Click to cycle through active and inactive states. When active, the icon is highlighted in dark gray. Set to active to allow the export tool to snap to poles.
|
||||
 |
Cable Select Toggle |
Click to cycle through active and inactive states. When active, the icon is highlighted in dark gray. Set to active to allow the export tool to pick up cables.
|
||||
 |
Reactivate Selection | Sometimes the operating system will take control away from ArcMap to run another service. Upon return, you may not be able to add to your selection. In such cases, click this button to resume normal operation of the export tool. | ||||
| Clear All from Selection | Use the Clear All button to remove all items from the current selection. This removes both Poles and Conductors. To remove individual components, click the red X next to the component you want to delete. | |||||
 |
Export | The Export button initiates the transfer of the items the user has selected in ArcMap to OHDA. This opens OHDA and loads the selected features into it. |
| MISSING WIDGET TYPE: The "Example Box" Widget Type could not be found. The "Example Box" Widget Type may have been deleted since this Widget was created. |
| MISSING WIDGET TYPE: The "Example Box" Widget Type could not be found. The "Example Box" Widget Type may have been deleted since this Widget was created. |
