ArcFM Desktop Configuration Guide
Create Login for Designer

Resource Center Home

These steps are only necessary for those who use Mobile Designer and a login database.

Follow these steps if your set up meets both of the following criteria.

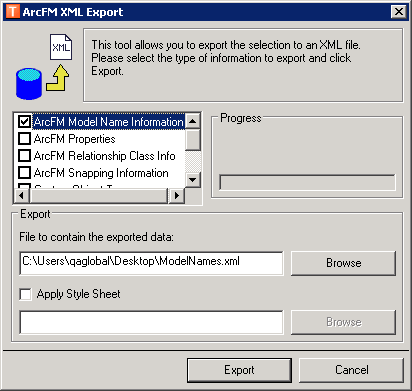
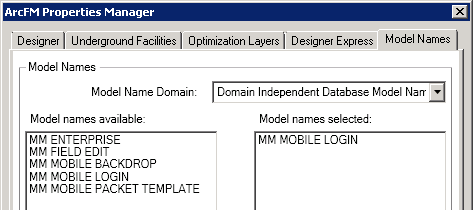
These steps walk through the process necessary to create the login database for use with Designer in the field.

Do not attempt to upgrade an existing login database. Doing this will result in errors and a corrupt login database. You must create a new login.


  1. The first steps must be performed on your backdrop database which as created in the previous set of steps (Create Backdrop Database). In ArcCatalog, select your backdrop database.
  2. Open the CU Administration tool.
  3. On the Update Schema tab, click Execute.
  4. Close the CU Administration tool.
  5. Next, create your login database. In ArcCatalog, create a new *.mdb. Right-click a directory in Folder Connections and select New > Personal Geodatabase.
  6. Select your new login database and run the Create/Update ArcFM Solution System Tables tool. Once the tables have been created, you'll see the ArcFM Info Log. Click OK to dismiss it.
  7. With the login database selected, click the Upgrade ArcFM Solution Database button. Click Yes to confirm that you want to upgrade the database. When the upgrade is complete, click OK.
  8. In ArcCatalog, expand the Enterprise database and copy all tables that start with "MM_CU". This includes tables that start with MM_CUDF and MM_CUTF.
  9. Paste these tables into your login database.
  10. Select the login database and run the ArcFM Solution Object Converter. Select "Convert to use Designer objects" and click OK. Click Yes when prompted.
  11. The ArcFM Solution Object Converter may prompt you to select a Spatial Reference for the Designer dataset. Click OK.
  12. In the New Spatial Reference window, click the Add Coordinate System drop-down button and choose Import. Browse to the Designer dataset in your Enterprise database and click Add. Click Next through the wizard. No other settings need to be changed. Click OK when the tool is finished.
  13. Next, you'll copy model names from the Enterprise to the login or backdrop database. Select the Enterprise database and click the ArcFM XML Export button. Select the checkbox next to ArcFM Model Name Information. Click Export.
  14. Select the login database and click ArcFM XML Import. Import the XML you exported in the previous step. Be sure to select the Overwrite option.
  15. Select the login database in ArcCatalog and click ArcFM Properties Manager. On the Model Names tab, assign the MM MOBILE LOGIN model name. If any other model names are assigned (e.g., MM ENTERPRISE), unassign them. Click OK to dismiss the ArcFM Properties Manager.
  16. In ArcCatalog, select the login database and open the CU Administration tool. On the Update Schema tab, click Execute. 

    After clicking the Execute button, the Update Schema tab will indicate "No Action Take" on all tables. Regardless, this step MUST be performed. DO NOT UPGRADE COMPATIBLE UNITS ON THE MIGRATE DATA TAB.

  17. Close the CU Administration tool and restart ArcCatalog.
  18. In ArcCatalog, select the login database and open the CU Administration tool. Verify that the filters are present.

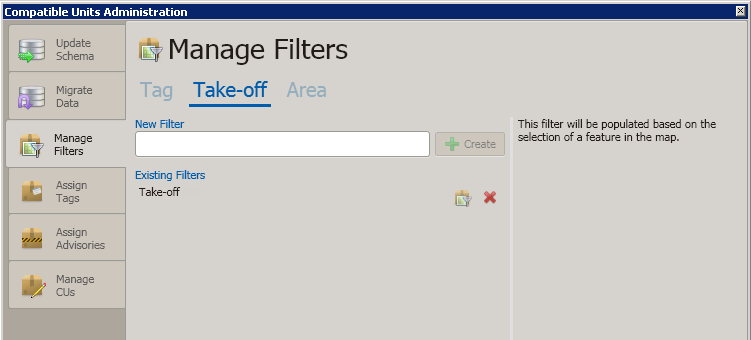
    DO NOT click the Edit button for a take-off or area filter. These filters should never be edited in the field (i.e., in the login database). They must only be edited on the Enterprise.

  19. In ArcCatalog, login to the Enterprise database and open the System Favorites Manager.
  20. On the Compatible Units tab, export the Compatible Units and (optionally) the System Favorites you wish to make available in the field.
  21. Click Export. Give the exported XML file a name and click Save. If you're exporting both CU and favorites, you will have multiple exported XML files.
  22. Click OK to dismiss the System Favorites Manager.
  23. Select the login database and open the System Favorites Manager.
  24. On the Compatible Units tab, expand the Compatible Units node and delete all CUs, if any exist. In the System Favorites list, delete any favorites you intend to import. If you don't delete the existing CUs and system favorites, you'll have duplicates after importing in the next step.
  25. Select the node that corresponds to the XML you're importing (i.e., select Compatible Units node to import CUs) and import the XML you exported in previous steps.
  26. You will be prompted to identify the backdrop database with each import. This provides the favorites and CUs with the location of the feature class tables stored in the backdrop.
  27. Click OK to dismiss the System Favorites Manager. 
  28. In ArcCatalog, open the backdrop database and locate the feature class tables used by the take-off and area filters. In the next set of steps, you'll export the empty feature class tables from the backdrop into the login database.

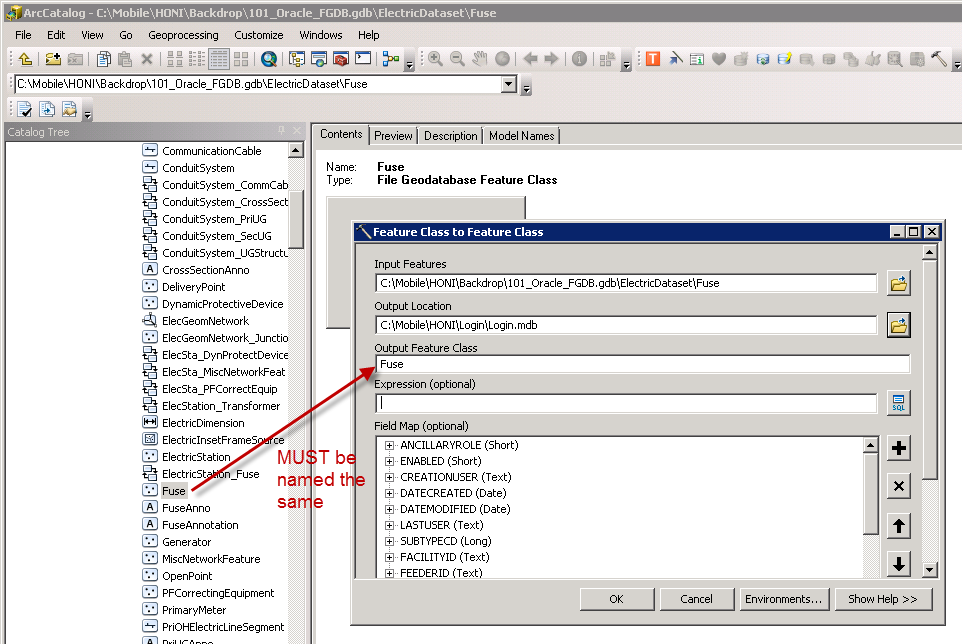
    Which Tables Are My Filters Using?

    To find out which feature class tables your take-off and area filters are using, open the CU Administration tool on the Enterprise database.

    Select the Manage Filters tab and click Take-Off.

    Click the Edit button next to a filter. The Assigned Feature Class Attributes field lists the feature classes used by that filter. Make note of this feature class and copy the corresponding table in the Enterprise database. Do this for each take-off and area filter in the Enterprise.

  29. In the backdrop, right-click the feature class table to be exported and select Export > To Geodatabase (single).
  30. This displays the Feature Class to Feature Class window. In the Output Location field, browse to the login database.
  31. In the Output Feature Class field, give the feature class the same name as it appears in the backdrop. It is critical that these tables be named exactly the same. Click OK.
  32. Right-click the login database and select Properties. You'll need to add model names to a domain before assigning them to the tables you just imported.
  33. On the Domains tab, select the Designer Object Class Model Name domain. In the Coded Values add the following model names: CUDOMAINFILTER and BACKDROP. Click OK.
  34. In the login database, use the ArcFM Properties Manager to assign the CUDOMAINFILTER and BACKDROP model names to each table that you exported.
  35. Next, you'll add stored displays to the login database. In the login database, delete the MM_SYSTEM_STORED_DISPLAYS and MM_SYSTEM_PACKAGES tables.
  36. In ArcCatalog, copy MM_SYSTEM_STORED_DISPLAYS and MM_SYSTEM_PACKAGES from your Enterprise database and paste them into the login database. This adds all system stored displays in the Enterprise to the login.
  37. Select the login database and click the Data Source Wizard button on the ArcFM Solution toolbar in ArcCatalog. In the next few steps you will use this tool to connect the stored display layers to the feature layers in the login geodatabase.
  38. Read the information provided on the first screen and click Next.
  39. Select the stored display(s) and/or document(s) you'd like the mobile user to access in the field. All unnecessary stored displays and documents will be removed later. Click Next.
  40. You will need to set all data sources, so accept the default setting on the next screen. Click Next.
  41. Browse to the backdrop geodatabase when selecting the destination data source. This connects the layers in the selected stored displays/documents to the feature class tables in the backdrop. Click Next.
  42. Review the Summary and click Next to connect the stored display/document layers to the feature class tables in the backdrop geodatabase.
  43. Next, open the login database in ArcMap and delete any stored displays and/or documents that the user will not require in the field. This will likely include all stored displays you chose not to connect using the Data Source Wizard.
  44. In this last set of steps you'll need to use a SQL statement to remove the database owner information from two tables in the login database. First, close ArcMap and ArcCatalog.
  45. Open the login database using Access.
  46. In Access, select the Create tab and click Query Design.
  47. Close the Show Table window.
  48. Right-click in the Query1 window and select SQL View.
  49. Delete "SELECT;" and enter the following SQL statement.
    UPDATE
    MM_CU_DOMAINFILTER
    SET
    FEATURECLASS= Mid(FEATURECLASS, iif( IsNull(Instr(1, FEATURECLASS,".")),1,Instr(1,FEATURECLASS,".")+1 ) )
    
  50. Click Run. When prompted to confirm, click Yes.
  51. Replace the SQL statement with this one: 
    UPDATE
    MM_CU_LIBRARY
    SET
    TABLENAME= Mid(TABLENAME, iif( IsNull(Instr(1, TABLENAME,".")),1,Instr(1,TABLENAME,".")+1 ) )
    
  52. Click Run. When prompted to confirm, click Yes.
  53. Close Access


Send Comment to documentation@schneider-electric.com


Send Comment to ArcFMdocumentation@schneider-electric.com